
Want to create an interactive pricing calculator, quote estimator, or cost calculator in Bricks Builder?
Forms don’t always have to collect information. Sometimes, they also need to process the information visitors provide and display a calculated result. You might want to calculate the total cost of a product based on its price and quantity, estimate a service cost based on measurements, or calculate a booking price based on the number of guests.
Max Addons comes with Advanced Form Fields for Bricks Builder, including a Calculator Field. It lets you define calculation formulas using values from other form fields and automatically display the calculated result to visitors.
In this guide, we’ll show you how to add a Calculator Field to your Bricks Builder forms, explain its settings, and walk through a practical example of creating a painting cost calculator.
Before we begin our tutorial, let’s take a quick look at some common questions you might have.
What Is the Calculator Field for Bricks Builder?
Calculator Field in Max Addons for Bricks Builder lets you perform automatic calculations based on values entered or selected in your form.
Instead of asking visitors to calculate totals themselves, you can define a formula that processes the values from other fields and generates the result automatically.
Imagine a form where visitors enter:
- Quantity: 850
- Product Price: $48
The Calculator Field can use a formula such as: Product Price × Quantity, and automatically display: $40,800
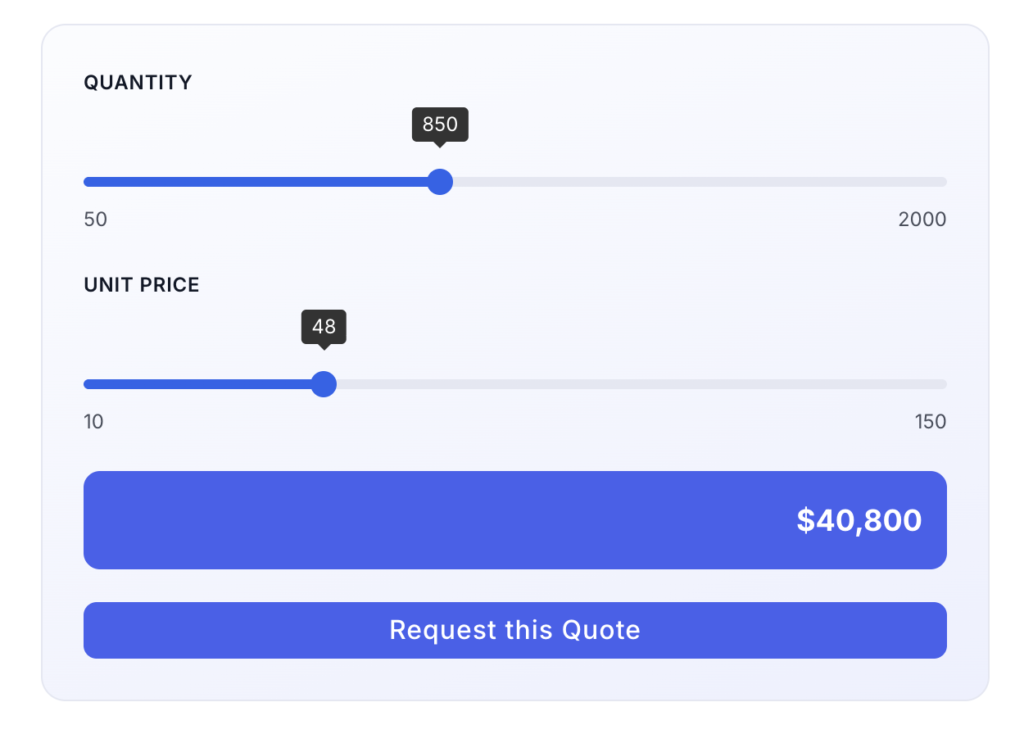
The calculated result can update as the related form values change, making the Calculator Field particularly useful for interactive quote forms, pricing calculators, estimators, and similar forms.
Why Use a Calculator Field in Your Bricks Builder Forms?
A calculator can make your forms more interactive and useful by providing visitors with an immediate result based on the information they enter. Rather than filling out a form and waiting for someone to calculate a price or estimate, visitors can see the result as they change their inputs.
For example, imagine you’re creating a product order form where visitors enter the product price and quantity. A Calculator Field can multiply those two values and automatically display the total cost. Similarly, a service business could use it to estimate a price based on a project’s size, while a booking website could calculate a total based on the number of guests and the per-person cost.
This makes the Calculator Field particularly useful for pricing calculators, quote forms, estimators, booking forms, and other forms where the final result depends on user input.
Key Features of the Calculator Field
Max Addons Calculator Field for Bricks Builder forms includes several options that let you control both the calculation and the way the result is displayed.
You can:
- create custom formulas using values from other form fields,
- control the number of decimal places
- add prefixes or suffixes to make the result easier to understand
- set a default value
- make the field required
- adjust its width
- assign a custom field name
Together, these settings give you enough flexibility to create calculators for different types of forms and use cases.
When Should You Use the Calculator Field?
Calculator Field is useful whenever you need to calculate a result based on information provided by a visitor. This could be a simple multiplication, such as Product Price × Quantity, or a more practical calculation such as Number of Guests × Cost Per Person.
Some common use cases include pricing calculators, quote request forms, loan or EMI calculators, product cost estimators, service pricing forms, and booking or reservation forms.
For example, a painting company could ask visitors for the width and height of a wall and use those values to calculate the total area. A service provider could then use that area to estimate the project’s cost.
Before You Begin
Before adding the Calculator Field to your form, make sure the Form Fields extension is enabled in Max Addons.
From your WordPress dashboard, go to WordPress Dashboard >> Bricks >> Max Addons >> Extensions. Enable the Form Fields extension and the form fields you need, then save your changes.
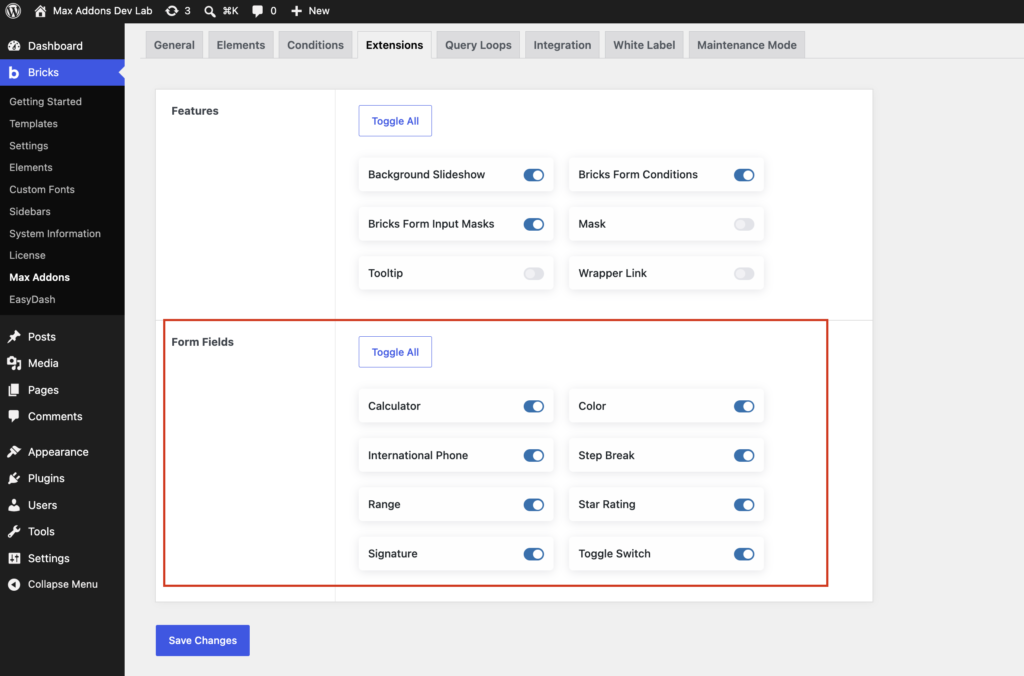
Once the extension is enabled, you can add the Calculator Field from the Form element in Bricks Builder.
How to Add a Calculator Field to Bricks Builder Forms
Adding the Calculator Field to your form only takes a few steps.
Step 1: Open Your Page in Bricks Builder
Open the page where you want to add the calculator and launch it in Bricks Builder. You can add the Calculator Field to a new form or an existing form, depending on your requirements.

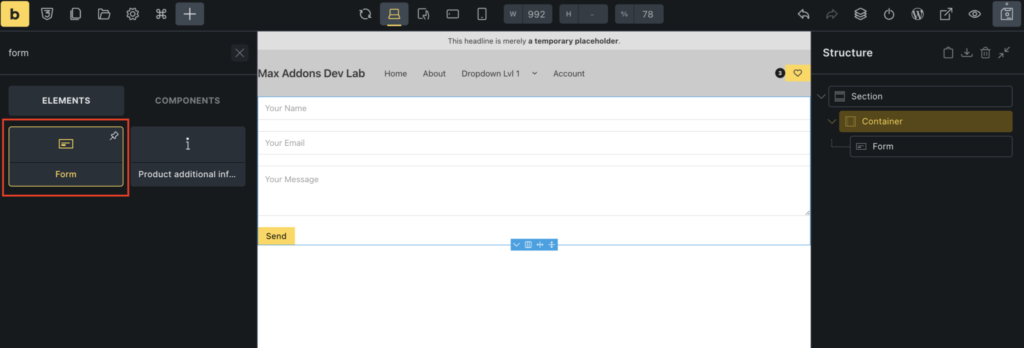
Step 2: Add the Form Element
Add the Form element to your page. If you’ve already created a form, select the existing Form element to open its settings.
Step 3: Open the Fields Section
In the Form element settings, locate the Fields section. This is where you can add and configure the individual fields that visitors will use to enter or select information.
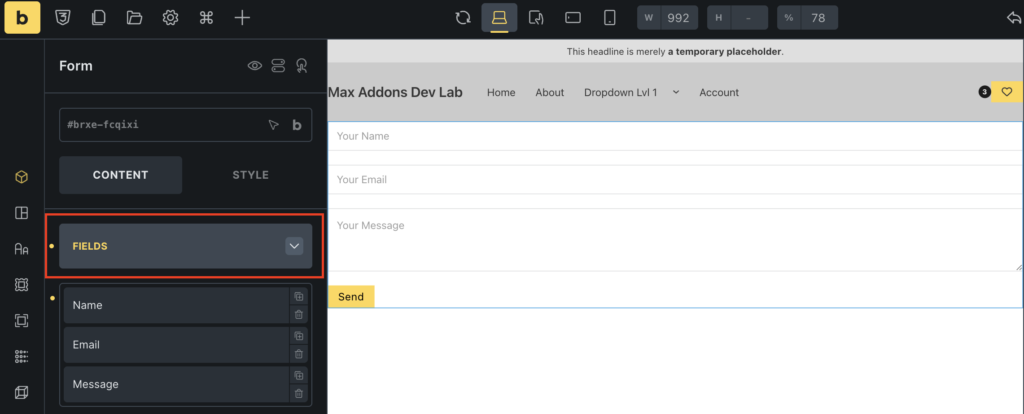
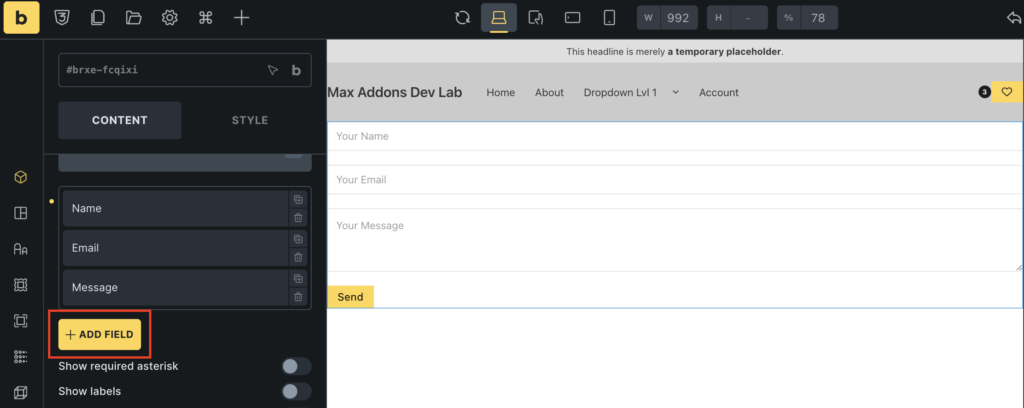
Step 4: Add a New Field
Click + Add Field to create a new field within your form. You can then select the type of field you want to use.
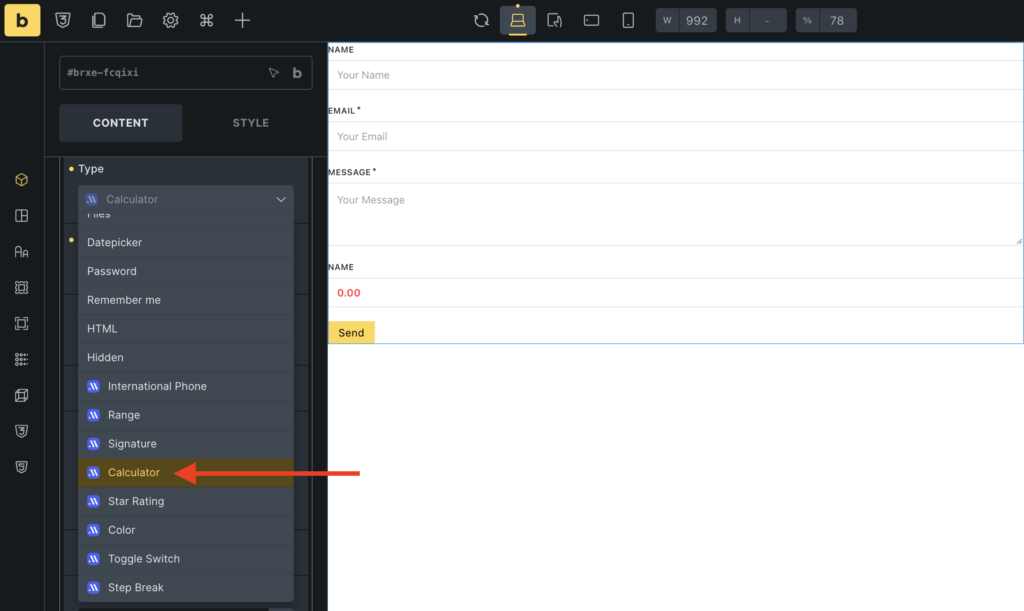
Step 5: Select Calculator
Open the Type dropdown and select Calculator [Max Addons]. The Calculator Field will now be added to your form, and you can configure its settings according to the calculation you want to perform.
Configure the Calculator Field
After adding the Calculator Field, you’ll find several settings that control its label, value, formula, formatting, and appearance. Let’s look at each setting and understand how you can use it.
Label
The Label setting lets you describe the result displayed by the calculator. A clear label helps visitors understand exactly what the calculated number represents.
You could use labels such as Total Cost, Estimated Price, or Total Amount. If your calculator is being used to estimate a service price, Estimated Price is more helpful than a generic label such as Result.
Value
The Value setting lets you define a default value for the Calculator Field. In most cases, you can leave this field empty because the calculator will generate its value using the formula you configure.
If your particular use case requires a starting or default value, you can define it using this setting.
Attribute: Name
Use Attribute: Name to assign a unique name to the Calculator Field. For example, you could use total_price for a field that displays the total cost of an order.
Using a descriptive field name makes the calculated value easier to identify in submitted form data. A name such as total_price immediately tells you what the value represents, whereas a generic name such as calculator1 provides very little context.
Width (%)
The Width (%) setting controls how much horizontal space the Calculator Field occupies within your form. You can use a value such as 100% when you want the calculator to span the full width of the form, or use 50% when you want it to sit beside another field.
The right width will depend on your form layout and the way you’ve arranged your other fields.
Required
Enable Required when the calculated value is necessary for the form submission. This can be useful when the calculation represents an important part of the information being collected, such as a total price or estimated project cost.
For example, if you’re creating a quote request form where the estimated cost is an essential part of the submission, you can make the Calculator Field required.
Formula
The Formula setting determines how the Calculator Field calculates its result. You can create a formula that uses values from other fields in your form to generate the final result.
For example, a product order form could use Product Price × Quantity to calculate the total price. A booking form could use Number of Guests × Cost Per Person to calculate the estimated booking amount. Similarly, a service calculator could use Area × Price Per Square Foot to estimate the project cost.
As the related form values change, the calculated result can update accordingly, giving visitors an interactive way to see how their selections affect the final result.
How to Choose a Formula
Before creating your formula, first identify the fields that will provide the input values. Then determine what mathematical operation needs to be performed and what result you want to display to visitors.
For example, if you’re creating a simple product order form, you might have a Product Price field and a Quantity field. The Calculator Field can then use those values to calculate and display the Total Price.
This approach keeps the calculation connected to the visitor’s input, so they don’t have to work out the total themselves.
Decimal Places
The Decimal Places setting lets you control how many decimal places are displayed in the calculated result. This is especially useful when you’re working with prices, measurements, or other values that require consistent formatting.
For example, setting the decimal places to 0 will display 250, while setting them to 2 will display 250.00. For a pricing calculator, displaying two decimal places can make monetary values look more consistent and easier to interpret.
Prefix
Use the Prefix setting to add text or a symbol before the calculated result. A common example is a currency symbol such as $.
If your calculator displays 250 and you add $ as the prefix, the result becomes $250. This immediately tells visitors that the calculated value represents a monetary amount.
Suffix
The Suffix setting works the opposite way: it adds text after the calculated result. This is particularly useful when the result represents a measurement, duration, or another value with a unit.
For example, you could add kg to display 250 kg, cm to display 250 cm, or Hours to display 5 Hours. Adding the appropriate unit makes the result easier for visitors to understand
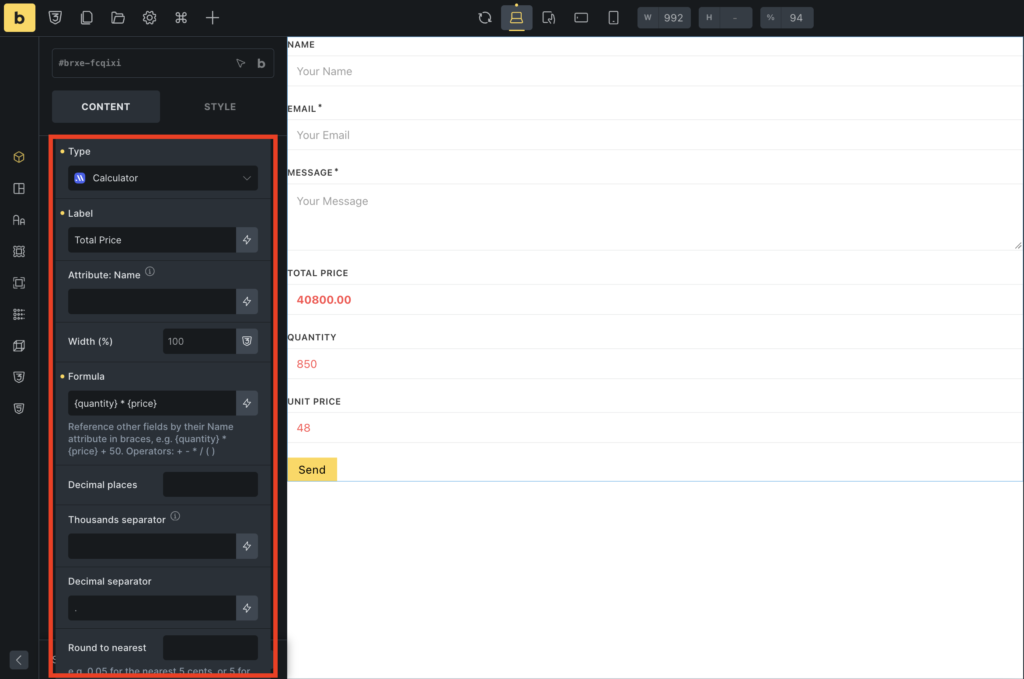
Step 6: Add the Fields Used in Your Calculation
The Calculator Field uses values from other form fields to perform calculations. So, before creating the formula, you need to add the fields that will provide those values.
For our example, we’re creating a simple pricing calculator using the formula:
Product Price × Quantity
This means we need two additional fields in our form: one for the Product Price and another for the Quantity.
Add the Product Price Field
First, add a new form field for visitors to enter or select the product price.
Click + Add Field in the Form element and select Range [Max Addons] from the Type dropdown.
Configure the field according to your requirements. For example, you can use Product Price as the label and set an appropriate default value. You can also define the minimum and maximum values that visitors can select.
Most importantly, set the Attribute: Name for this field. For example: product_price
The attribute name is important because you’ll use this exact name when creating the formula in the Calculator Field.
For example, if the field’s attribute name is product_price, you need to use product_price in your calculation formula.
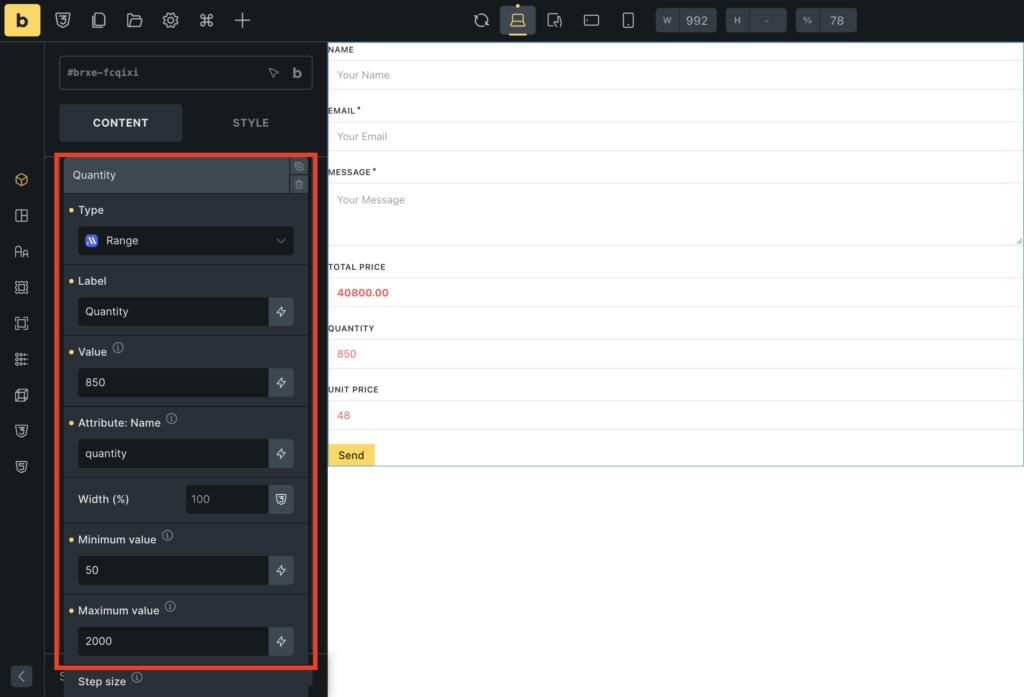
Add the Quantity Field
Next, add another form field for the quantity.
Again, click + Add Field and select Range [Max Addons] as the field type.
Set the label to something like Quantity, define a suitable default value, and set the minimum and maximum values according to your requirements.
For the Attribute: Name, use: quantity
Just like the Product Price field, this attribute name will be used in the Calculator Field’s formula.
Why Are Attribute Names Important?
The Calculator Field needs to know which form fields it should use for the calculation. The Attribute: Name acts as the identifier that connects each input field to the formula.
For our example, we’ll use:
- Product Price:
product_price - Quantity:
quantity
We can then reference these names in the Calculator Field formula: product_price * quantity
The Calculator Field will use the values from these two fields to calculate the total automatically.
Once you’ve added both input fields and assigned their attribute names, you’re ready to configure the Calculator Field and create the formula.
Recommended Calculator Field Configuration
If you’re creating a simple pricing calculator, you could configure the Calculator Field with a label such as Total Cost, use total_price as the attribute name, and create a formula based on Product Price × Quantity.
For financial calculations, setting Decimal Places to 2 and adding $ as the Prefix can make the result easier to read. You can also enable Required if the calculated value needs to be included in the form submission.
The exact configuration will depend on what you’re calculating, but the important thing is to make sure the formula, label, and formatting clearly communicate the result to visitors.
Practical Example: Create a Painting Cost Calculator
Let’s take a practical example of a painting service that wants to provide visitors with an estimated project cost through a Bricks Builder form.
Instead of asking visitors to manually calculate the area of their walls, the form can collect the required measurements and compute the area automatically. The visitor could enter the Wall Width and Wall Height, while another field could contain the applicable price per square foot.
The calculation could follow a simple workflow: Wall Width × Wall Height = Total Area
The resulting area can then be used to calculate the estimated painting cost: Total Area × Price Per Square Foot = Estimated Cost
This gives visitors an immediate estimate based on the information they provide. If they change the wall dimensions, the calculated values can update accordingly.
The same approach can be adapted for many other businesses. A flooring company could calculate flooring costs based on room dimensions, a cleaning company could estimate prices based on property size, or a service provider could calculate project costs based on the quantity of work required.
Next Read: How to Add a Toggle Switch to Bricks Builder Forms
The Calculator Field for Bricks Builder makes it easier to turn a standard form into an interactive calculator, estimator, or pricing tool. Instead of requiring visitors to perform calculations themselves, you can use formulas to process their inputs and display the results directly within the form.
From simple calculations such as Product Price × Quantity to more practical use cases such as service estimates, booking costs, and project pricing, the Calculator Field can be adapted to a wide range of forms.
You can also control how the result looks by setting the number of decimal places and adding prefixes or suffixes. Combined with clear labels and meaningful field names, these options help you create calculators that are both functional and easy for visitors to understand.
Also, if you’re looking for a simple way to add On/Off choices to your Bricks Builder forms, check out our detailed tutorial on how to add a toggle switch to Bricks Builder forms.
Build Smarter Bricks Builder Forms with Max Addons
The Calculator Field is just one of the ways Max Addons for Bricks can help you build more capable forms without adding custom code or relying on multiple third-party plugins.
If you’re building forms that need more than basic text fields and checkboxes, explore Max Addons to discover additional form fields and powerful features designed specifically for Bricks Builder. Add interactive calculations, advanced fields, conditional form behavior, and more to create richer experiences for your visitors.
Ready to take your Bricks Builder forms further? Explore Max Addons for Bricks and start building more powerful forms today.

1 comment