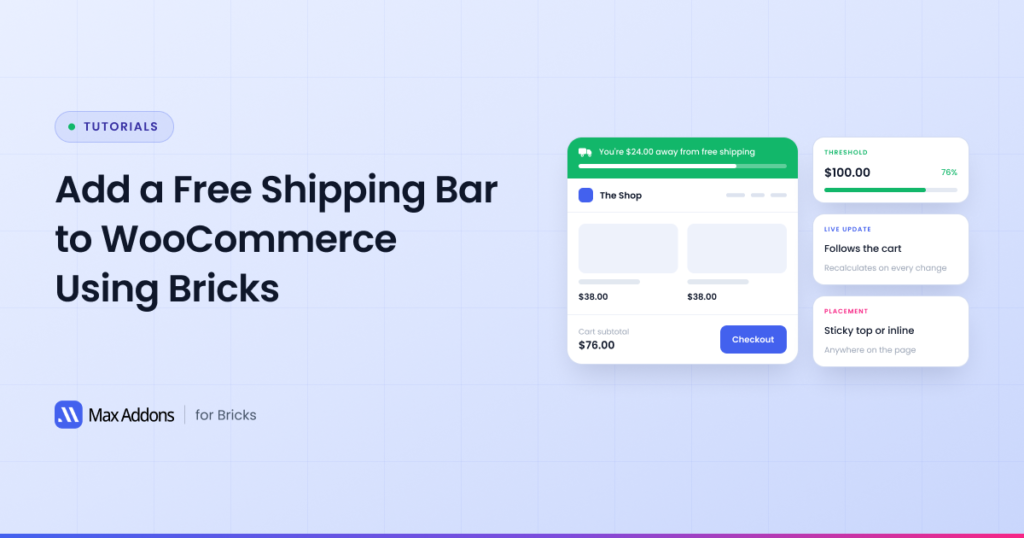
Free shipping is one of the simplest ways to encourage customers to complete a purchase. However, simply offering free shipping is not always enough. Customers also need to know how much they need to spend before they can qualify for it.
A Free shipping bar for WooCommerce makes this much easier. It shows shoppers how close they are to reaching your free shipping threshold and can encourage them to add another product to their cart.
If you’re using Bricks Builder to design your WooCommerce store, you can add this functionality using Max Addons. Its Free Shipping Bar element lets you display a dynamic shipping notice, progress bar, and success message without writing custom code.
In this guide, we’ll show you how to add a free shipping bar to WooCommerce using Bricks Builder and explain all available customization options.
What Is a Free Shipping Bar?
A free shipping bar is a dynamic notification that tells customers how close they are to reaching a free shipping goal. It works by comparing a customer’s current cart total with the free shipping threshold you’ve set for your store.
For example, suppose your store offers WooCommerce free shipping over an amount of $100. If a customer has $60 worth of products in their cart, the bar can display a message such as “Spend $40 more to get free shipping.” As customers add more products, the message and progress bar can update automatically.
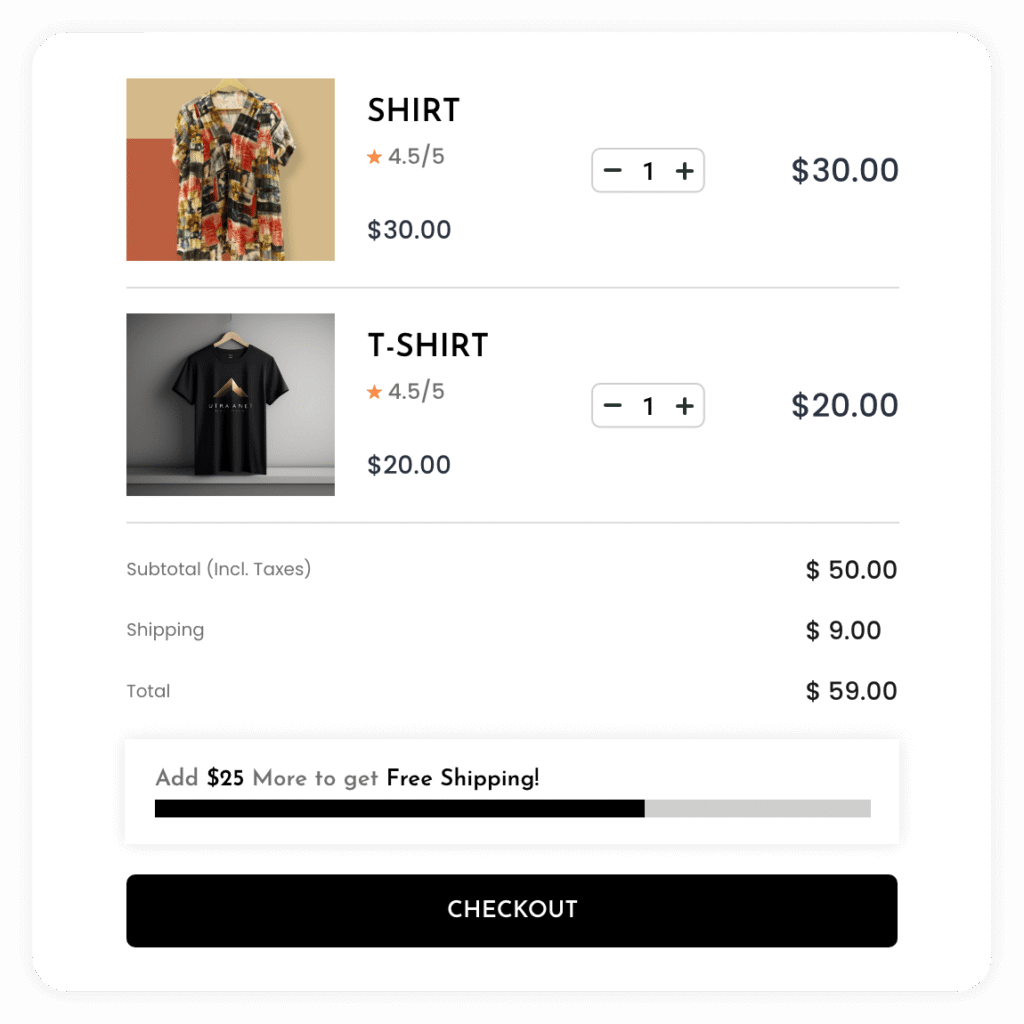
Once the customer reaches $100, the bar can display a success message such as “Congratulations! You qualify for free shipping.” This gives customers immediate feedback and makes your free shipping offer much more visible.
Why Add a Free Shipping Bar to WooCommerce?
Customers don’t always want to calculate how much more they need to spend to qualify for free shipping. A free shipping bar does that work for them and gives them a clear goal while they’re shopping.
A free shipping bar can help you:
- Encourage customers to increase their cart value
- Make your free shipping offer more visible
- Give shoppers a clear spending goal
- Improve the shopping experience
- Encourage customers to explore additional products
- Potentially increase average order value
What You Need to Add a Free Shipping Bar
Before adding Free Shipping Bar to your WooCommerce store, make sure you have the following tools installed and activated:
- WooCommerce: Required for your online store, products, cart, and shipping settings.
- Bricks Builder: Used to design and customize your WordPress and WooCommerce pages.
- Max Addons for Bricks Builder: Provides the Free Shipping Bar element along with other WooCommerce element
If you’re new to Bricks Builder, you can also explore Bricks Builder templates (Free & Premium) to get a head start on designing your website. Templates can save time and give you a ready-made structure that you can customize for your store.
Once WooCommerce, Bricks Builder, and Max Addons are ready, you’re all set to add the Free Shipping Bar.
How to Add a Free Shipping Bar in Bricks Builder
Adding a Free Shipping Bar to your WooCommerce website only takes a few steps. For this tutorial, we’ll add it to a WooCommerce Single Product template, but you can use the same element in other suitable WooCommerce layouts.
Step 1: Open Your WooCommerce Single Product Template
Start by opening your WooCommerce Single Product template in Bricks Builder. From your WordPress dashboard, go to Bricks >> Templates and open your Single Product template with the Bricks editor.
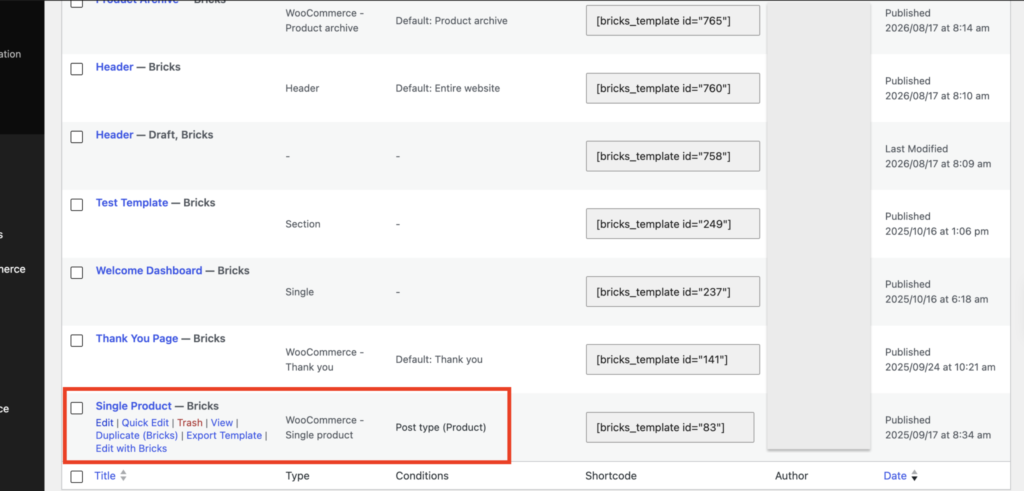
Using a template is useful because you can add a Free Shipping Bar once and have it appear across all products that use that template. This is particularly helpful when you’re working with a Bricks builder single product layout.
If you haven’t created a Single Product template yet, you can create one in Bricks Builder and assign it to your WooCommerce products.
Step 2: Search for the Free Shipping Element
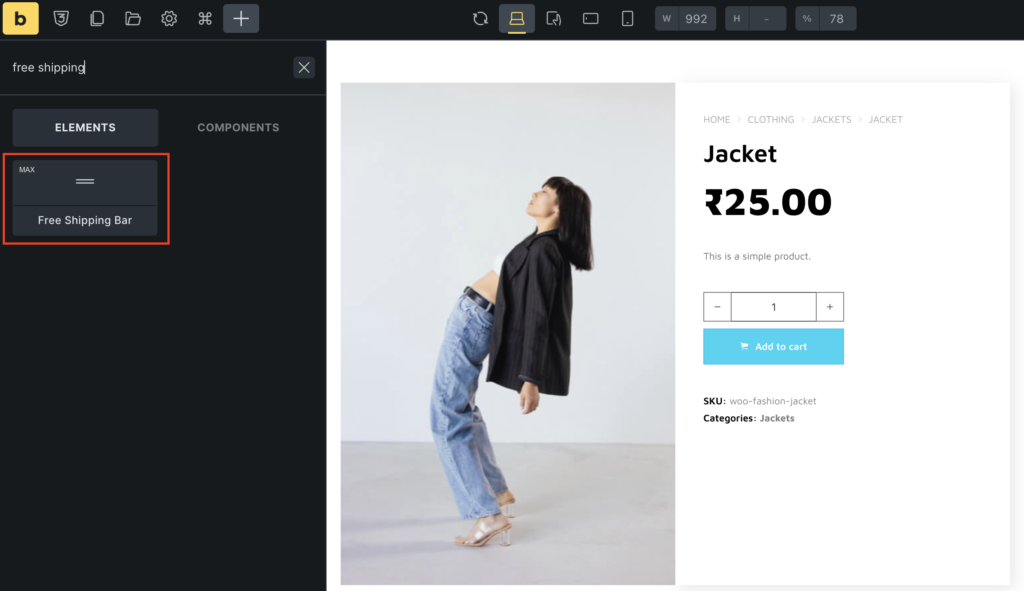
Once you’re inside Bricks Builder, click the + icon to add a new element. In the element search field, type “Free Shipping.”
You should see the Free Shipping Bar element provided by Max Addons. Make sure you’re selecting the correct element by checking for the “Max” tag displayed in the top-right corner of the element.
Step 3: Add the Free Shipping Bar
Add the Free Shipping Bar element to your page and place it where you want customers to see it. On a product page, you can place it near the product price or Add to Cart button so customers notice the free shipping offer before making a purchase.
You can also place it above product information, below the product description, or inside another custom WooCommerce section. Once you add the element, its customization options will appear in the left sidebar of Bricks Builder.
Customize Free Shipping Bar in Bricks Builder
Max Addons provides several options that let you control both content and appearance of the Free Shipping Bar. You can customize the shipping notice, progress bar, and message displayed after a customer reaches your free shipping threshold.
Let’s look at each section in detail.
Free Shipping Notice
Free Shipping Notice controls the message customers see while they are working toward your free shipping goal. You can either use a predefined message or create your own custom message.
Free Shipping Notice Type: You can choose between Default and Custom notice types.
With Default, the element uses a predefined message, making it a quick option if you don’t need to change the wording. If you want the message to match your store’s branding or communication style, choose Custom and write your own message.
For example, you could use messages such as:
- Spend {amount} more to get free shipping!
- You’re only {amount} away from free shipping.
- Add a little more to unlock free shipping.
- You’re almost there! Spend {amount} more for free shipping.
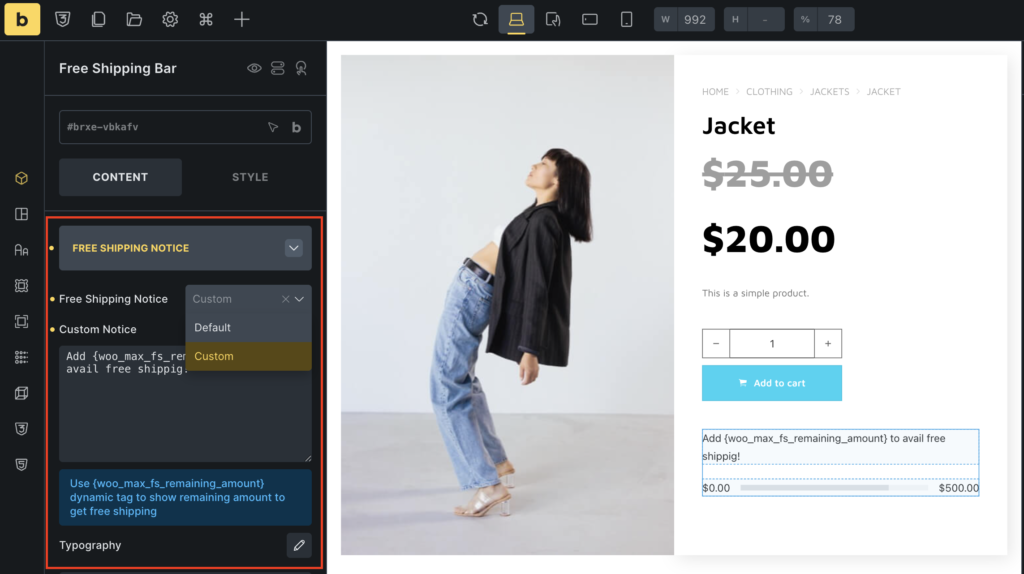
Keep your message short and direct so customers can understand it without having to stop and read a long explanation.
Progress Bar
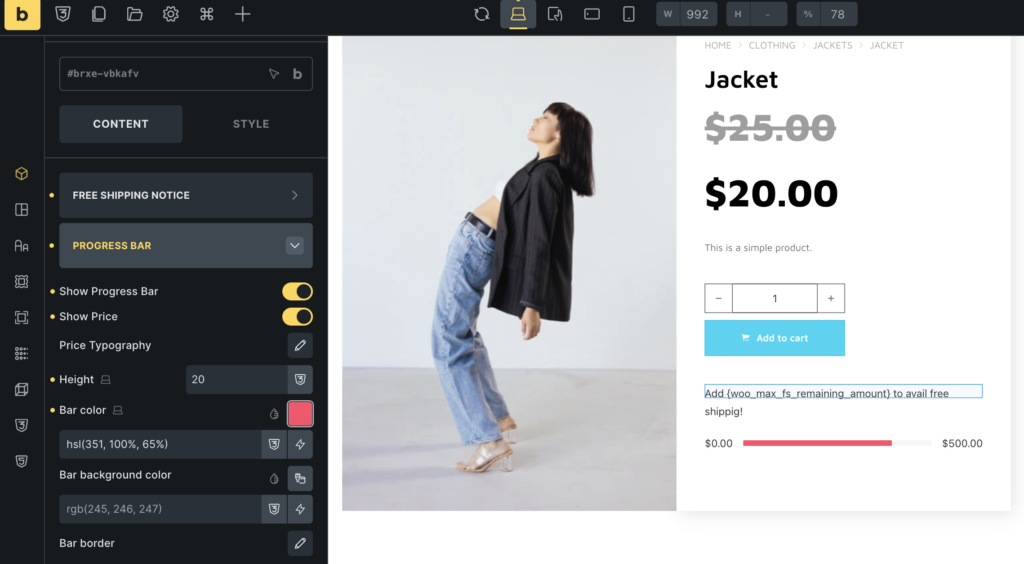
Progress Bar gives customers a visual indication of how close they are to reaching your free shipping threshold. Instead of relying only on text, shoppers can see their progress at a glance.
For example, if your free shipping threshold is $100 and a customer has spent $75, the progress bar can visually show that they’re around 75% of the way toward their goal.
- Show Progress Bar: Use the Show Progress Bar option to enable or disable the visual progress indicator. If you prefer a simple text-based notice, you can turn it off. If you want the free shipping offer to stand out, keeping it enabled is usually a better option.
- Show Price: The Show Price option lets you display the remaining amount a customer needs to spend before qualifying for free shipping. This is useful because it gives shoppers a specific target instead of making them figure out the difference themselves. For example, the message can show “Spend $25 more to get free shipping!” when the customer is $25 away from reaching your threshold.’
- Typography: You can customize the typography used for the price displayed in the progress bar. Adjust the font style, size, weight, and other available typography settings so the amount fits naturally with your website’s overall design.
- Height: The Height option controls how thick or thin your progress bar appears. A thinner bar works well for minimal layouts, while a thicker bar can make the progress indicator more noticeable.
- Bar Color: Use Bar Color to choose the color of the filled portion of your progress bar. You can use your primary brand color or another color that stands out against the background.
- Bar Background Color: Bar Background Color controls the unfilled portion of the progress bar. Choose a background color that provides enough contrast with the filled section so customers can easily understand how much progress they’ve made.
- Bar Border: The Bar Border option allows you to customize the border around your progress bar. You can use it to add a subtle outline or match the bar with other bordered elements on your website.
Success Message
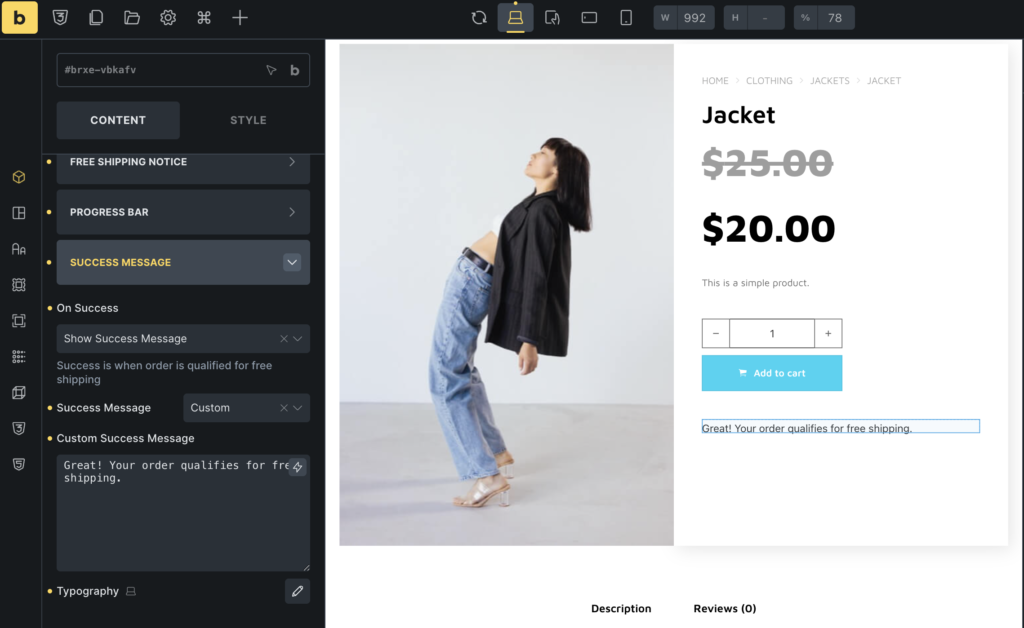
Once a customer reaches your free shipping threshold, you can change what appears on the page using Success Message options. Instead of continuing to show a message asking them to spend more, you can confirm that they’ve successfully unlocked free shipping.
- On Success: Under On Success, you can choose what happens after the customer qualifies for free shipping. With Show Success Message, you can display a confirmation message such as “Congratulations! You qualify for free shipping.” This gives customers immediate confirmation that they’ve reached the required amount.
Alternatively, you can select Hide Notice & Progress Bar. This removes the Free Shipping Bar after the customer reaches the threshold, which can be useful if you want to keep your page clean once the offer has been unlocked.
- Custom Success Message: You can also create your own success message instead of using a default message. This gives you an opportunity to add a little personality while confirming that free shipping has been unlocked.
- You unlocked free shipping!
- Great! Your order qualifies for free shipping.
- You’ve reached your free shipping goal!
- Nice! Free shipping is now unlocked.
- Typography: Use the available typography controls to customize your success message. You can adjust its appearance so it matches your store’s existing fonts, sizing, and visual style.
How Does Free Shipping Bar Work?
Once you’ve configured Free Shipping Bar, it automatically responds to changes in the customer’s cart value.
Suppose you’ve set your free shipping threshold at $100. When a customer adds $40 worth of products, they may see “Spend $60 more to get free shipping.” If they add another $30 product, the message can be updated to “Spend $30 more to get free shipping.”
Once their cart reaches $100, the progress bar reaches its goal and the success message can appear. This dynamic behavior means you don’t have to manually update the message as customers add or remove products.
Where Should You Display a Free Shipping Bar?
You can display a Free Shipping Bar in different parts of your WooCommerce website. However, you don’t necessarily need to add it everywhere. It’s usually more effective to place it where customers are actively browsing products or making purchasing decisions.
WooCommerce Single Product Page
A single product page is one of the most useful places to display a free shipping bar. If you’re already using a Bricks builder single product template, you can add the element near the product price or Add to Cart button.
WooCommerce Product Archive
You can also add the shipping bar to your product archive or shop layout. If you’re building your shop using a Bricks builder product archive, consider placing the bar near the top of the page where customers can easily see your free shipping offer.
Cart Page
Your cart page is another natural location for Free Shipping Bar. Customers have already selected their products, so showing them how close they are to free shipping can encourage them to add one more item.
My Account Page
Bricks Builder also allows you to customize WooCommerce account layouts, including Bricks builder my account templates and elements. Depending on your store’s design, you may use this area for additional shopping or promotional information.
However, Free Shipping Bar is generally more useful on product, shop, and cart pages because these are places where customers are actively deciding what to purchase.
Make Your Free Shipping Bar Responsive
Your Free Shipping Bar should look good on every device. Since many WooCommerce shoppers browse and purchase from mobile devices, make sure your bar works well on smaller screens.
Bricks Builder’s responsive controls and Bricks builder breakpoints make it easy to adjust your design for desktop, tablet, and mobile layouts.
After styling your Free Shipping Bar, switch between different device views and check how it looks at each breakpoint. You may need to adjust font size, spacing, padding, message width, or progress bar height for smaller screens.
Pay particular attention to longer messages. A message that looks clean on desktop can take up several lines on mobile, so keeping your copy short will usually produce a better result.
Use Free Shipping to Encourage Higher Order Values
A free shipping threshold can also be used as a simple strategy to increase average order value. For example, if customers typically spend around $65 and you offer free shipping on orders over $75, some shoppers may prefer adding another $10 product rather than paying a separate shipping fee.
A Free Shipping Bar makes this opportunity visible at exactly the right time. You can make the strategy even more effective by recommending smaller products that customers can easily add to their cart.
Frequently Asked Questions
A Free Shipping Bar is a dynamic notification that shows customers how close they are to reaching your free shipping threshold. It can update as products are added to or removed from their cart.
Yes. Max Addons provides options for customizing the shipping notice, progress bar, success message, typography, colors, height, border, and other available styling settings.
Yes. You can enable Show Price to display the remaining amount customers need to spend before they qualify for free shipping.
Yes. Under On Success, you can choose Hide Notice & Progress Bar to remove the bar after the customer reaches your free shipping threshold.
Yes. You can create your own success message and display it after a customer qualifies for free shipping. This lets you match the message with your store’s branding and tone.
Yes. You can add the element to your WooCommerce Single Product template using Bricks Builder. You can also use it in other suitable WooCommerce layouts, such as product archives and cart sections.
Yes. You can use Bricks Builder’s responsive controls and breakpoints to adjust the appearance of your Free Shipping Bar for desktop, tablet, and mobile devices.
Wrapping Up!
A free shipping offer becomes much more useful when customers can see exactly how close they are to qualifying. Instead of simply telling shoppers that free shipping is available on orders over a certain amount, you can show them their current progress and give them a clear reason to add another product.
With Max Addons for Bricks, you can add this functionality directly inside Bricks Builder and customize your shipping notice, progress bar, success message, colors, typography, and other design settings to match your WooCommerce store.
If you’re already using Bricks Builder to create WooCommerce templates, Free Shipping Bar is a simple addition that can make your shipping offer more visible while encouraging customers to increase their cart value.
Ready to add a free shipping bar to your WooCommerce store? Add Max Addons for Bricks Builder, open your WooCommerce template in Bricks Builder, search for Free Shipping, and start customizing your bar.

1 comment