Have you ever browsed an online store, found a product you liked, and wanted to save it for later?
That’s exactly what a wishlist is for.
Adding a Wishlist button to a WooCommerce product page is a great way to let shoppers save products they are interested in and return to them later. If you’re using Bricks Builder, you can add this functionality without writing custom code.
In this guide, we’ll show you how to add a Wishlist button to your WooCommerce Product Page using the Favorites Button element from Max Addons for Bricks.
We’ll also create a dedicated Wishlist page where shoppers can view their saved products and add a link that takes them directly to it.
Max Addons Favorites Button isn’t limited to WooCommerce products. You can also use it for blog posts, recipes, events, and other content types.
So let’s get started!
What You’ll Need
Before getting started, make sure you have the following installed and activated on your WordPress website:
You’ll also need a WooCommerce Single Product template where you can add the Favorites Button.
How Does the Wishlist Button Work?
Before we start building, here’s the basic workflow: Product Page >> Add to Wishlist >> Product is Saved >> View Wishlist
Favorites Button handles the first part. When a shopper clicks the button, the product is added to their favorites. Clicking the button again removes it.
Max Addons provides three button types:
- Toggle Favorite: Add or remove an item from favorites.
- Clear All Favorites: Remove all saved favorites.
- Favorites Count: Display the total number of saved favorites.
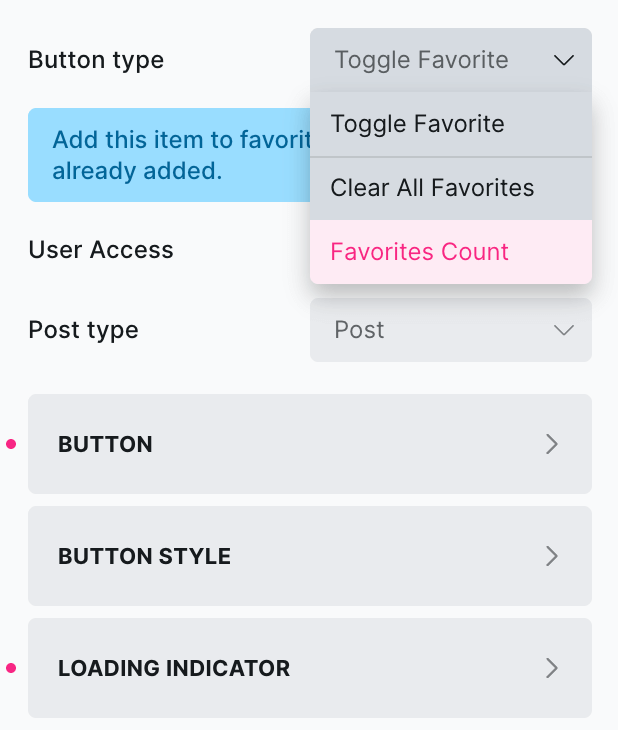
For a product page, we’ll use Toggle Favorite.
How to Add a Wishlist Button on a Product Page Using Bricks Builder
A wishlist is a simple feature, but it can make a big difference to the shopping experience. Not every visitor is ready to purchase a product the moment they find it. Some may want to compare options, wait for a better time to buy, or simply save something they like.
By adding a Wishlist button to your WooCommerce store, you give shoppers an easy way to save products and return to them later.
So, without further ado, let’s walk through the step-by-step process of adding a wishlist button to a WooCommerce product page using Bricks Builder and Max Addons.
Step 1: Open Your WooCommerce Product Template
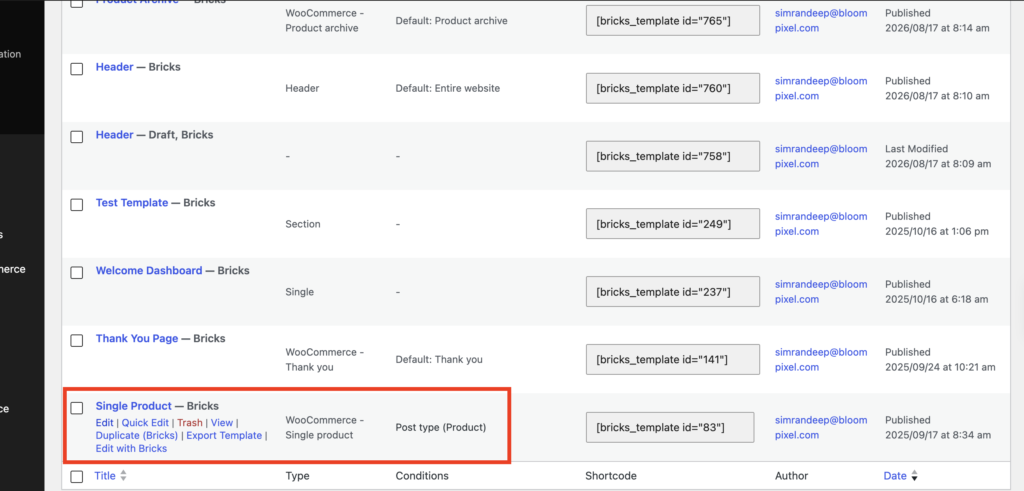
First, open the template that controls the layout of your WooCommerce product pages. In your WordPress dashboard, go to: Bricks >> Templates.

Open your Single Product template and edit it with Bricks Builder.
If you’re creating your product template from scratch, you can add your usual WooCommerce elements such as Product Image, Product Title, Product Rating, Product Price, Product Description, Product Variations, and Add to Cart.
We’ll add the Wishlist button alongside these elements.
Where Should You Place the Wishlist Button?
There isn’t one fixed location that works for every store.
For most product pages, a good place is: Product Information >> Price >> Add to Cart >> Wishlist. You can also place the button next to the Add to Cart button or use a heart icon over the product image.
The important thing is that shoppers should be able to find it easily without being distracted from the main purchase action.
Step 2: Add the Favorites Button
Once you’re inside the Bricks Builder editor:
- Click the + button.
- Search for Favorite.
- Find the Favorites Button element.
- Add it to your product layout.
- Make sure the element has the MAX label.
The MAX label confirms that you’re using the Favorites Button from Max Addons.
The element can be added directly to Bricks templates and used on shop pages, category pages, and product grids. This means you can let shoppers save products without having to open every single product page.
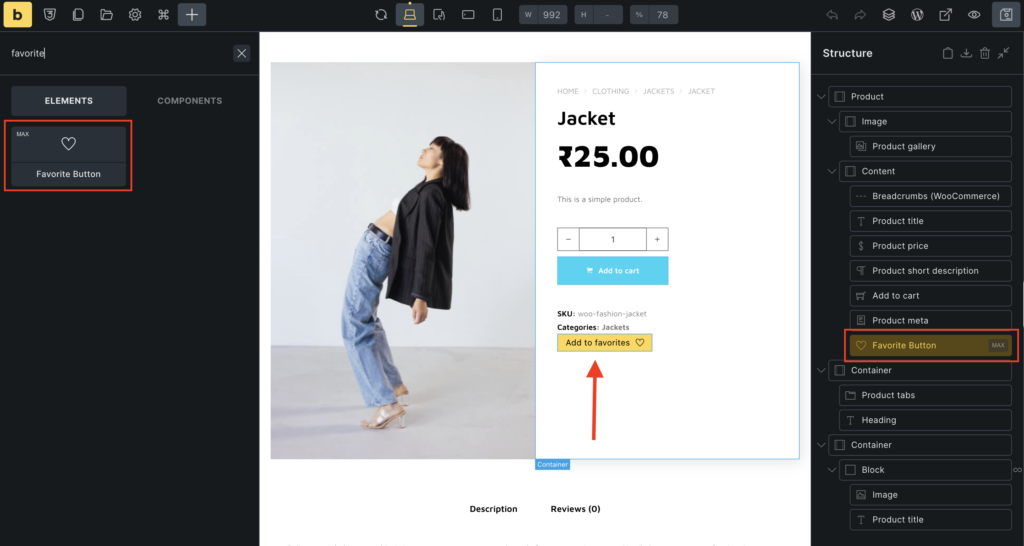
Once you’ve added the element, you’ll see the Content and Style tabs.
Step 3: Configure the Favorites Button
Now let’s configure the button to work as a Wishlist button.
Choose the Button Type
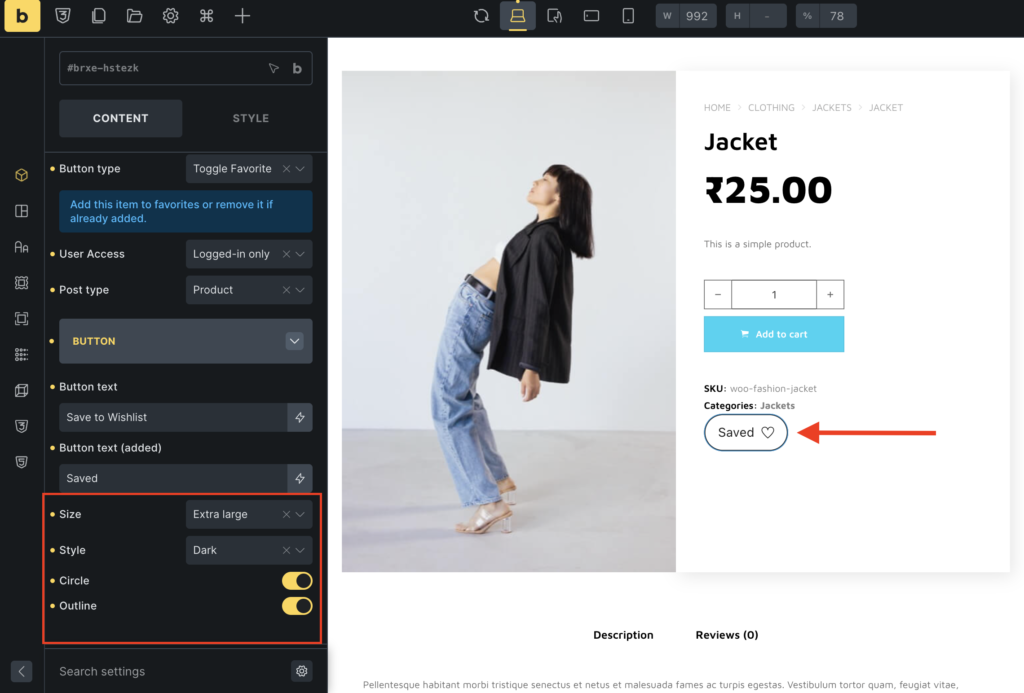
Open the Content tab and find Button Type. Select: Toggle Favorite
This is the option you need for a standard Wishlist button. It lets shoppers add the product to their favorites and remove it by clicking the same button again.
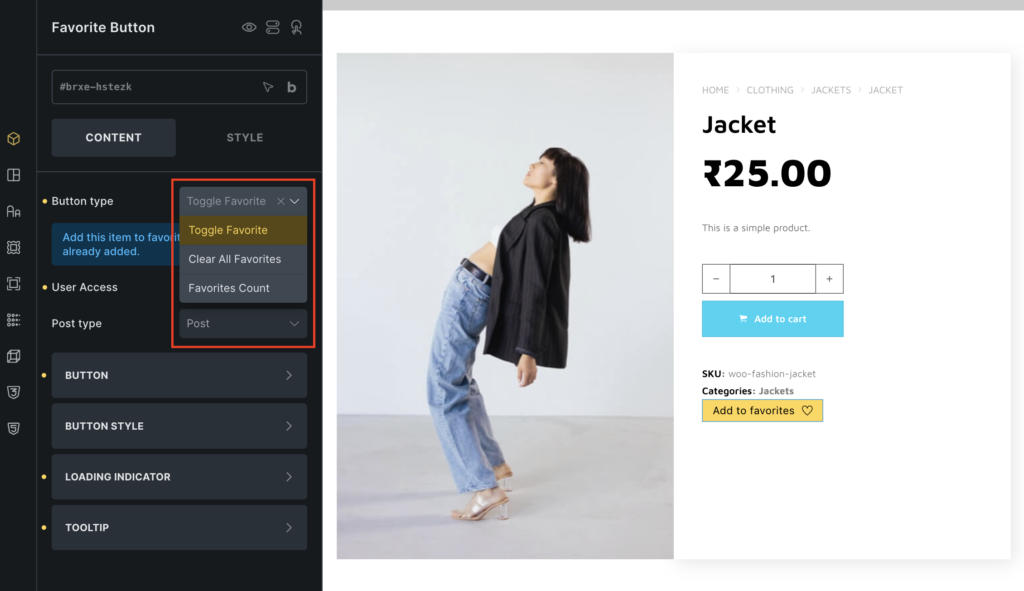
The other options are useful for different parts of your website:
- Clear All Favorites can be used to let shoppers remove all saved items.
- Favorites Count can be useful for displaying the number of saved items in areas such as a header or a wishlist.
For our product page, keep it set to Toggle Favorite.
Step 4: Choose Who Can Use the Wishlist
Next, look for the User Access option. You can choose between:
Logged-in Only
Only registered and logged-in users can use the Favorites feature. This can be useful if you want the wishlist experience to be limited to customers with an account.
All Users
All visitors, including guests, can use the Favorites feature. If you want to make the wishlist available to everyone who visits your store, choose All Users.
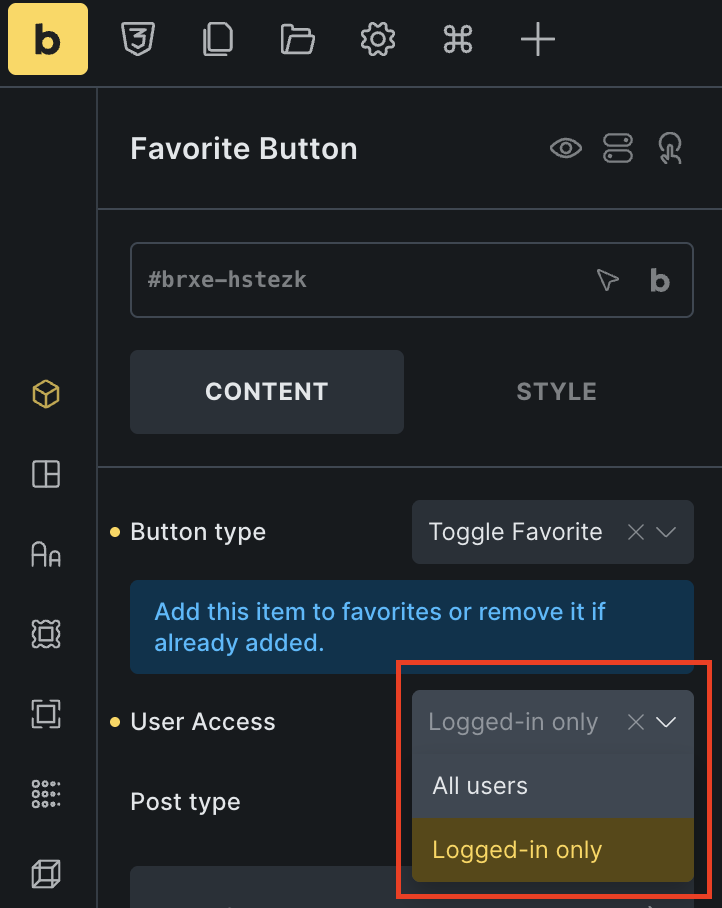
Max Addons supports both options, so you can choose the one that fits your store’s requirements.
Step 5: Select the Post Type
The Post Type setting determines what type of content the Favorites Button works with. For a WooCommerce use case, configure it for your product content.
Choose “Products“.
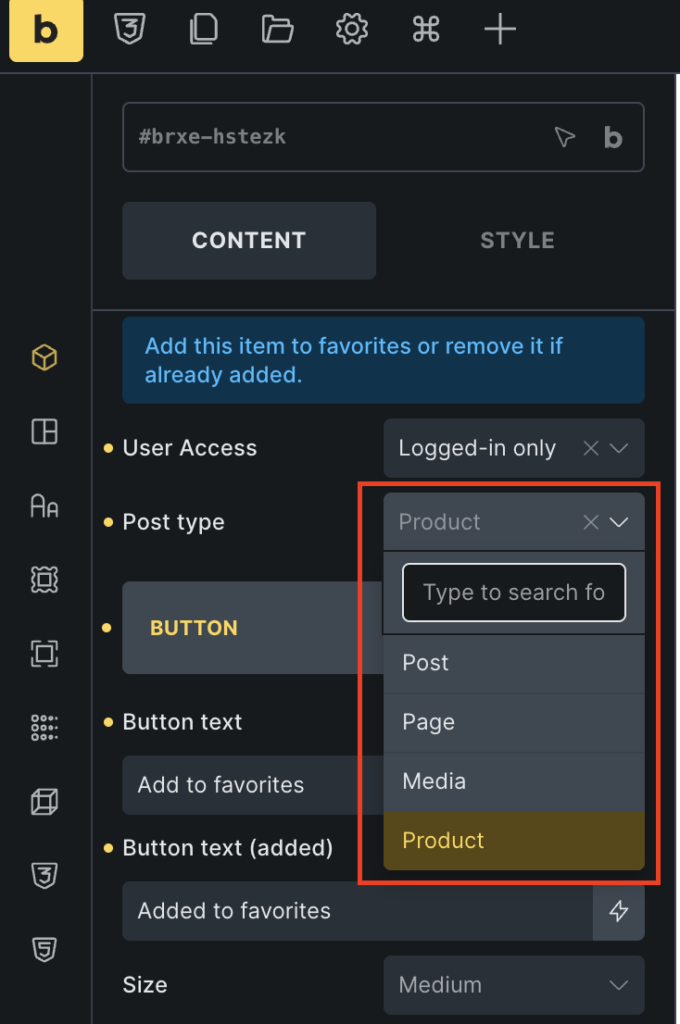
Max Addons supports the Favorites Button for products and other content types, such as blog posts and custom post types.
Step 6: Customize the Wishlist Button
Now you can make the button look like a proper Wishlist button instead of leaving it in its default state.
Under Button Settings, you can customize:
- Button Text: Add labels for the normal and added states.
Default: Add to Wishlist
Added: Added to Wishlist
You could also use:
Default: Save to Wishlist
Added: Saved
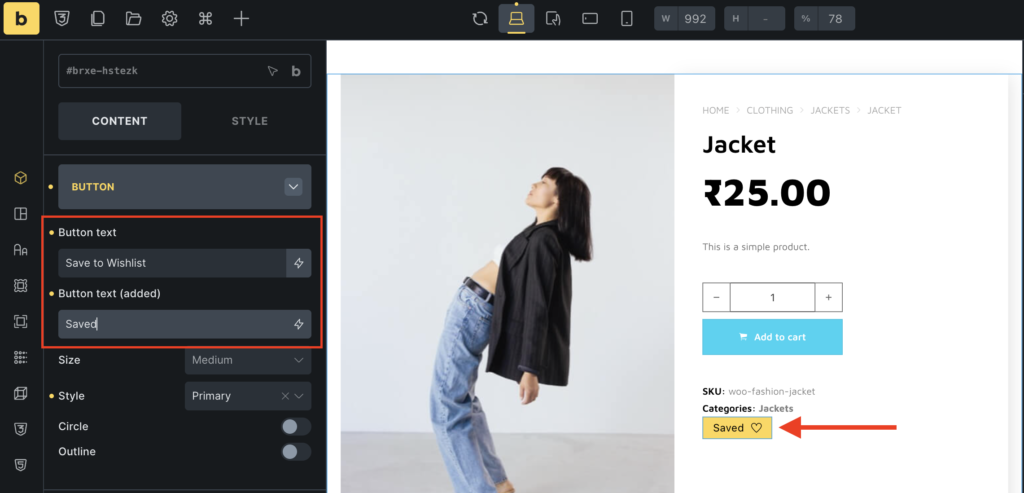
- Size: Choose from Small, Medium, Large, or Extra Large. Choose a size that fits naturally with your Add to Cart button and the rest of your product layout.
- Style: Choose a predefined button style such as Primary, Secondary, Light, Dark, or Muted. You can then further customize its appearance from the Style tab.
- Circle: Enable Circle to create a circular, icon-only Wishlist button. This works particularly well when placing a heart icon over the product image.
- Outline: Enable an outline style for a lighter button that doesn’t compete with the Add to Cart button.
Step 7: Add a Wishlist Icon
A heart icon is one of the easiest ways to make a Wishlist button instantly recognizable. Under the Icon settings, you can add:
- Button Icon for the default state
- Button Icon (Added) for the added state
For example:
Default: ♡ Add to Wishlist
Added: ♥ Added to Wishlist
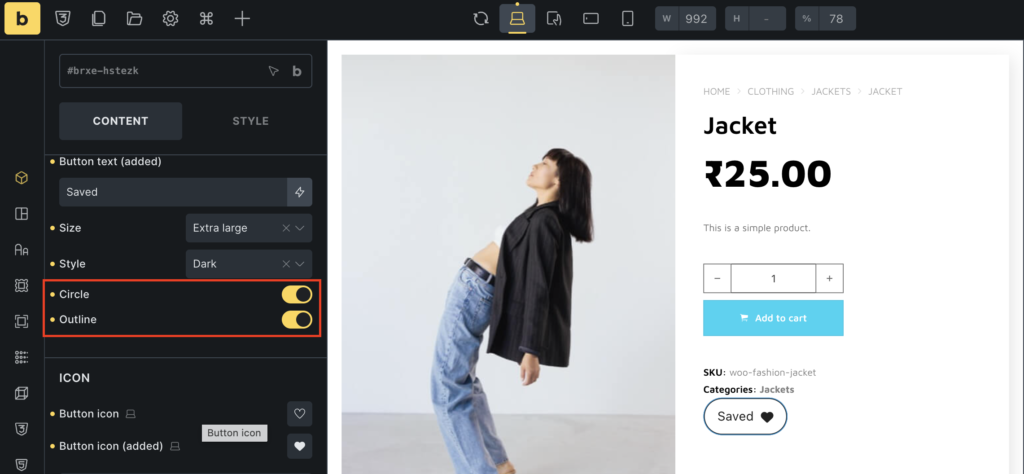
Using different icons for these two states gives shoppers immediate visual feedback when they save a product.
If you’re creating an icon-only Wishlist button, you can use an outlined heart for the default state and a filled heart for the added state.
Step 8: Style the Wishlist Button
Once the functionality is ready, the next section is Button Style. Max Addons gives you separate styling controls for the default and added states.
- Default State: You can customize: Typography, Background Color, Border, Box Shadow, Padding.
- Added State: You can customize: Typography, Background Color, Border, Box Shadow.
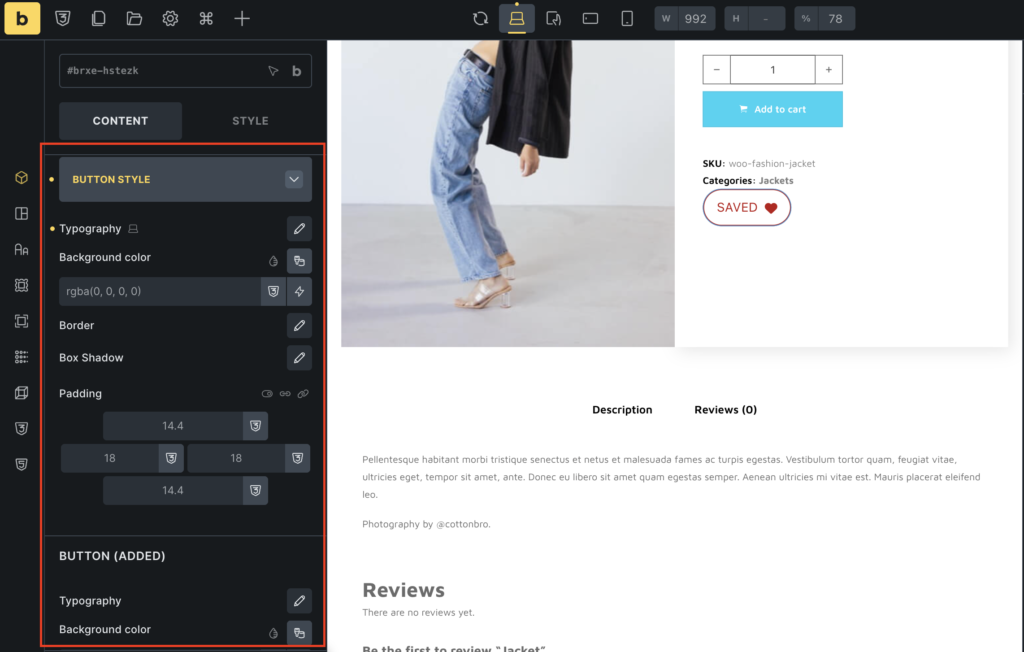
For example, you could keep the default button subtle and change its appearance after a product has been added.
This small state change makes it much easier for shoppers to understand whether a product is already in their wishlist.
Step 9: Add a Loading Indicator
The Favorites Button can also display a loading state when it’s interacted with. This is particularly useful because it gives users immediate feedback that their action is being processed.
To enable it:
- Open the Loading Indicator settings.
- Enable Loading Indicator.
- Choose a Spinner or Icon.
- Adjust the color and size.
If you choose Spinner, you can customize:
- Spinner Size
- Spinner Width
If you choose Icon, you can adjust:
- Icon Size
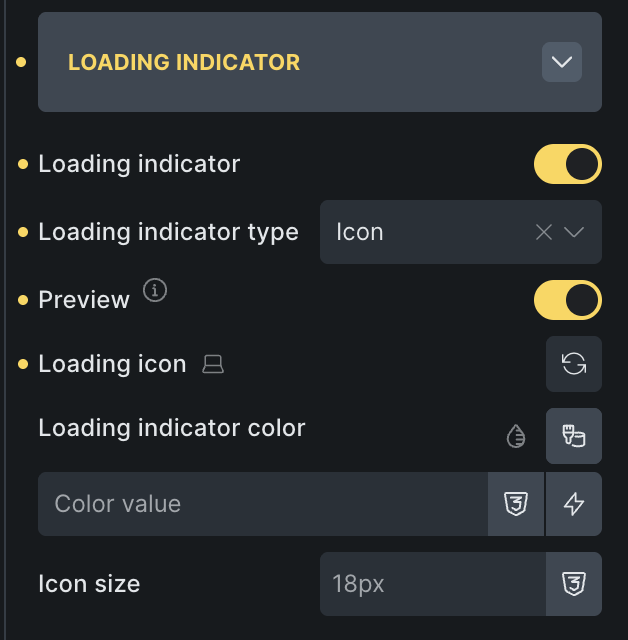
You can also preview the loading indicator while designing the button in Bricks Builder.
Step 10: Add a Tooltip to the Wishlist Button
If you’re using an icon-only Wishlist button, a tooltip can make its purpose clearer. For example, a shopper hovering over a heart icon could see:
Add to Wishlist: After the product is saved:
Added to Wishlist: To enable it:
- Open the Tooltip settings.
- Enable Tooltip.
- Add the default tooltip text.
- Add the tooltip text for the added state.
- Choose the tooltip position.
- Adjust the horizontal and vertical offset.
You can also customize the tooltip’s appearance from the Tooltip Style settings.
Customize the Tooltip
You can control: Typography, Background Color, Border, Box Shadow, Border Radius, Width, Padding.
The default and added tooltip states can be styled separately.
Customize the Tooltip Animation
Under Advanced Options, you can adjust: Delay, Transition In, Transition Out, Translate X, Translate Y, Tooltip Scale.
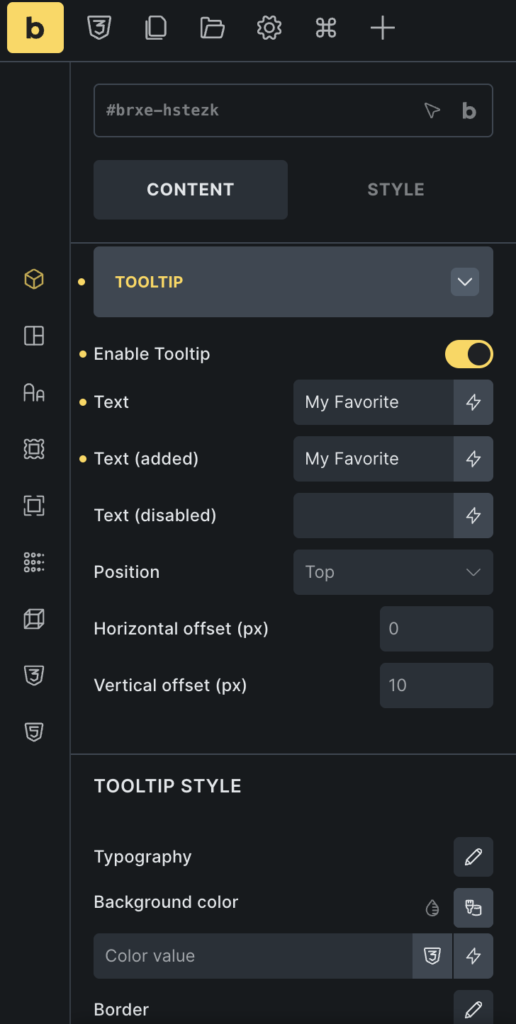
These settings let you control how and where the tooltip appears.
How to Create a Wishlist Page in Bricks Builder
Adding a Wishlist button is only half of the experience. Once shoppers save products, they need a place to view them.
Step 11: Build a Dedicated Wishlist Page
This is the part that’s easy to miss: the Favorites Button only adds/removes items; it doesn’t display them. To actually show customers what they’ve saved, you need a separate Wishlist page.
Create a New Page
- Go to WordPress Dashboard >> Pages >> Add New. Name the page Wishlist or My Wishlist, then click Edit with Bricks.
- Add a Container or Block to the page and enable the Query Loop.
- Under the Query Loop settings, select:
- Type: Max Query
- Max Query Type: Favorites Post
- Inside the Query Loop, add the product elements you want to display, such as:
- Product Image
- Product Title
- Product Price
- Add to Cart Button
- Optional: Add a Favorites Button inside the loop to let users manage their wishlist directly from the page. You can set its action to Clear All Favorites or Toggle Favorite, depending on how you want the wishlist to work.
- Optional: To display the total number of favorited products elsewhere on your website, such as in the header, add another Favorites Button and set its action to Favorites Count.
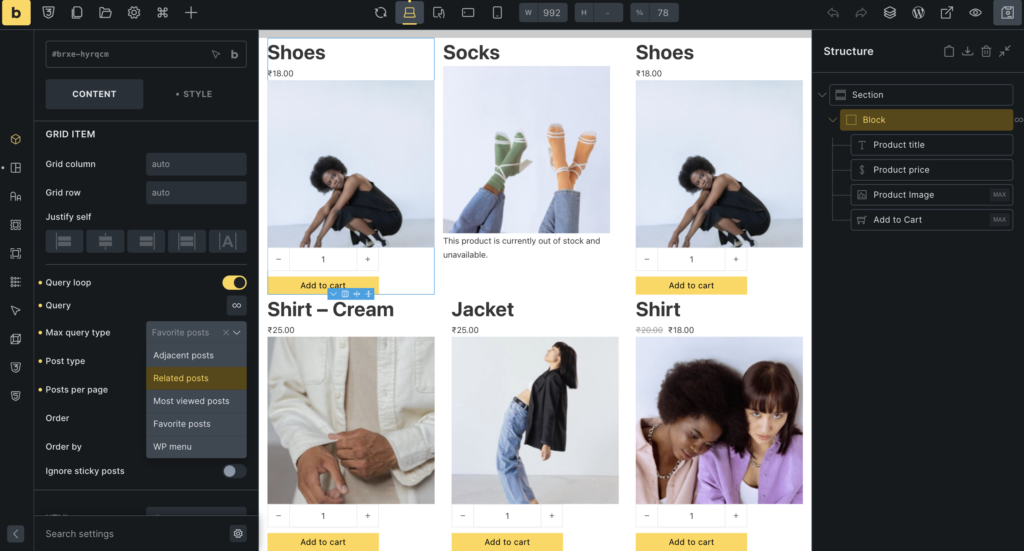
Add a 3-Column Grid for Wishlist Products
To display your saved products in a clean grid layout, select the Section you added to the Wishlist page.
Go to: Section >> Display >> Grid.
Publish the page.
How to Link the Product Page to the Wishlist Page
Since the Favorites Button itself is a toggle and doesn’t navigate anywhere, “redirecting to the wishlist page” is handled by a separate link or button, not by a setting within the Favorites Button element.
Step 12: Redirect Users to the Wishlist Page
There are two common approaches:
Option 1: Add a “View Wishlist” Button
Add a regular Button element in Bricks Builder next to or below the Favorites Button. Set the button text to “View Wishlist”.
Then link the button to your Wishlist page.
Your product page can now have two clear actions:
- ♡ Add to Wishlist: Saves the product.
- View Wishlist: Takes the shopper to the Wishlist page.
This is usually the better approach because clicking the Wishlist button doesn’t interrupt the shopping experience.
A shopper can save the product and continue browsing, while the View Wishlist link provides a clear path to their saved products.
Option 2: Add a Wishlist Link to Your Header
You can also make the Wishlist accessible from your website header. For example:
Shop | Categories | Wishlist | Cart
You could even use the Favorites Count button to show the number of saved items. The Favorites Button supports a Favorites Count mode for displaying the total number of saved items.
This is especially useful when shoppers are browsing multiple products. They can save products as they go and open their Wishlist whenever they’re ready.
Can You Redirect Users to the Wishlist After Clicking the Button?
Not directly through the Favorites Button.
The Favorites Button is designed to toggle the favorite state, rather than act as a navigation link. Its available button types are Toggle Favorite, Clear All Favorites, and Favorites Count.
If you want shoppers to visit the Wishlist page, use a separate View Wishlist button or a Wishlist link in your website header.
This gives you a more natural flow: Add to Wishlist >> Continue Shopping >> View Wishlist
rather than: Add to Wishlist >> Immediately leave the product page
Best Practices for Adding a Wishlist Button
A Wishlist feature works best when it’s easy to understand and doesn’t get in the way of shopping. Here are a few things to keep in mind.
- Keep the Wishlist and Add to Cart Buttons Close Together: The Wishlist and Add to Cart actions are closely related, so placing them near each other makes them easier to find.
- Use a Familiar Heart Icon: A heart icon is immediately recognizable as a Wishlist or Favorites action.
- Show a Clear Added State: Don’t leave users wondering if their click worked. Changing: ♡ Add to Wishlist to ♥ Added to Wishlist provides instant feedback.
- Don’t Hide the Wishlist: If shoppers can save products but can’t easily find their saved items, the feature loses much of its value. Add a View Wishlist link on product pages and consider adding a Wishlist link to the header.
- Make the Button Work on Mobile: On smaller screens, make sure the button is large enough to tap comfortably and doesn’t get pushed too far below the main product information.
Frequently Asked Questions
You can add a Wishlist button to a WooCommerce product page using the Favorites Button from Max Addons for Bricks. Add the element to your Single Product template, choose Toggle Favorite, configure the user access and product settings, and customize the button’s appearance.
Yes. Max Addons’ Favorites Button is designed to work with WooCommerce products and other content types. It can also be added to shop pages, category pages, and product grids.
Yes. The Favorites Button provides an All Users option, allowing visitors, including guests, to use the feature. You can also restrict it to Logged-in Only users.
Yes. Set the Favorites Button’s Button Type to Favorites Count to display the total number of saved favorites.
Yes. The Favorites Button includes a Clear All Favorites button type that removes all saved favorites at once.
Yes. You can customize the button’s text, size, style, icons, colors, typography, borders, padding, box shadow, and more. You can also style the default and added states separately.
Yes. The Favorites Button can be added to shop pages, category pages, and product grids, allowing shoppers to save products without opening each product page.
The Favorites Button itself is used to add or remove favorites rather than navigate to another page. If you want users to visit the Wishlist page, add a separate “View Wishlist” button or link it in your website header.
Wrapping Up!
Adding a Wishlist to your WooCommerce store can give shoppers an easy way to save products they’re interested in and return to them later.
With Bricks Builder and Max Addons, you can build the experience without adding custom code. If you want to give shoppers more flexibility while browsing your WooCommerce store, a Wishlist is a small feature that can make the overall shopping experience much more convenient.
If you have any questions about setting up the Favorites Button, you can contact the Max Addons team.
Explore more from the blog:
