
Intro: Are you looking for a way to create a WooCommerce product table with Bricks Builder? Well, look no further because Max Addons’ Table element allows you to display your WooCommerce product details in an organized tabular format. You can leverage the power of Query and fetch any element to display on your table without any custom CSS and HTML code.
In this competitive world of eCommerce business, it’s super important to make online stores unique and attention-grabbing. One cool way to do this is by making your product display more interesting and easy to use. Instead of the standard grid layout, why not try something new and fun?
Product tables can help. They organize your products neatly, making it easier for people to find what they’re looking for. And when things are easier to find, they’re more likely to buy!
So, let’s learn how to create these WooCommerce product tables step by step!
What are WooCommerce Product Tables?
WooCommerce product tables offer a tidy and structured way to showcase your products on your online store. Unlike the traditional grid layout, where products are laid out in rows and columns, product tables display your items in a table format, similar to what you’d see in a spreadsheet.
In these tables, each row represents a product, with columns displaying key details like product name, price, image, description, and more. This format allows customers to easily compare products and find all the information they need without hopping between different pages.
By using WooCommerce product tables, you can enhance your customers’ browsing experience, improve navigation on your site, and ultimately increase conversion rates by making it easier for shoppers to find and purchase the products they’re interested in.
Why Display WooCommerce Products in Tables?
Creating WooCommerce product tables offers several benefits for both store owners and customers:
- Organization and Efficiency: Product tables present information in a structured and organized manner, allowing customers to compare multiple products.
- Product Visibility: Product tables can display more products on a single page, increasing the visibility of your inventory. This can help customers discover products they might have missed and encourage them to make additional purchases.
- Ease of Comparison: Product tables allow for easy comparison of product features, prices, and other details as everything is presented in a standardized format. Customers can quickly identify differences and similarities between products.
- Simplified Navigation: Product tables often include filtering sorting options that allow visitors to refine their search results based on specific parameters. This simplifies navigation and helps customers find the products that best meet their needs.
Create WooCommerce Product Tables With Bricks Builder using Max Addons
Now that we have learned the benefits of displaying WooCommerce products in a table, let’s see how you can create a product table with the Bricks Builder and Max Addons’ Table element.

Max Addons’ Table element is a multipurpose advanced tool for adding tables to your WordPress website. You can create tables with Custom data and define a Query to fetch any element of your website and display it in a tabular format.
Today, we are going to leverage the power of Query and fetch WooCommerce products-related data in a table. This helps you present WooCommerce products with all the necessary information on a single page.
And… did I mention that you even get plenty of customization and styling options to alter your table design according to your preference?
So, without any further ado, let’s dive in!
1. Install and Activate Max Addons
Before proceeding, make sure you’ve got Max Addons installed and activated on your WordPress website.
2. Create a New Page
After activating Max Addons, go to your WordPress website dashboard and add a new page. You can also edit an existing page.

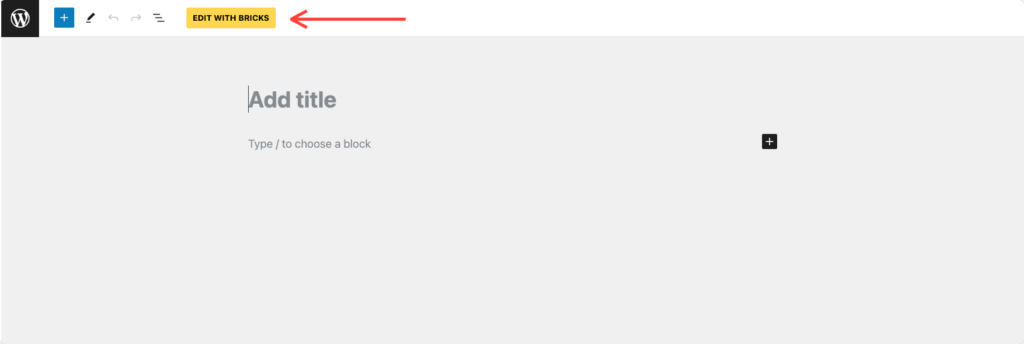
3. Edit with Bricks Builder
After creating your page, click the Edit With Bricks button.
4. Add the Table Element
Once you open the page:
- Add a Section to the page.
- Find the “table” element in the Bricks Builder elements area.
- Click on it to add it to your page.
- Verify that the “MAX” tag is displayed on the upper left corner of the icon.

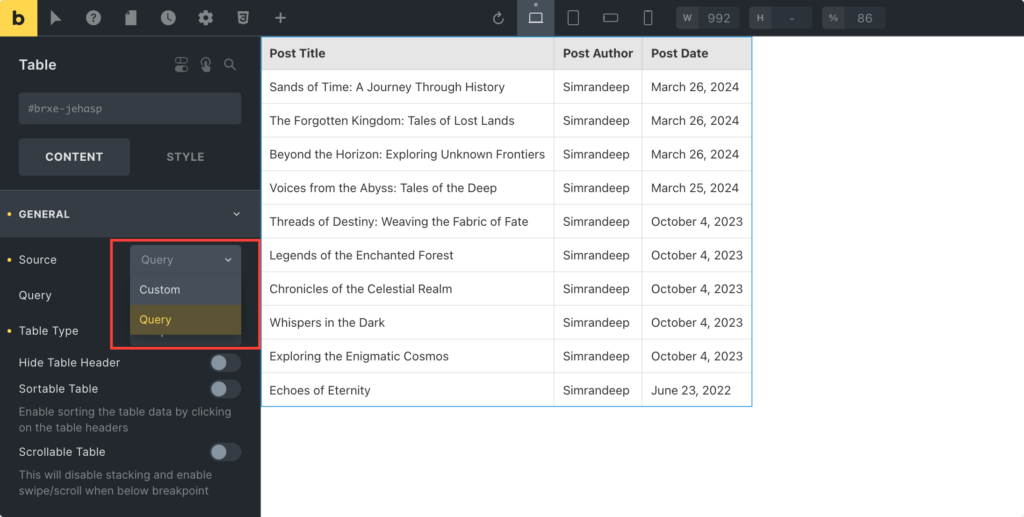
5. Choose “Query” as a Source
As soon as you add the Table element, the default table layout will appear on the page, and its settings will appear on the left panel. The first tab in the settings panel is GENERAL. The options in this tab provide extensive control over the content, layout, and functionality of the WooCommerce product table.
The first setting option that you’ll find in the General tab is Source. Using this option, you can choose between manually defining the content of the table (Custom) or pulling content dynamically from your WordPress database using a query (Query).
Because we need to display WooCommerce Product details in a table, we’ll choose “Query” as our table source. Selecting the Query option enables you to fetch WooCommerce products automatically based on specific criteria.
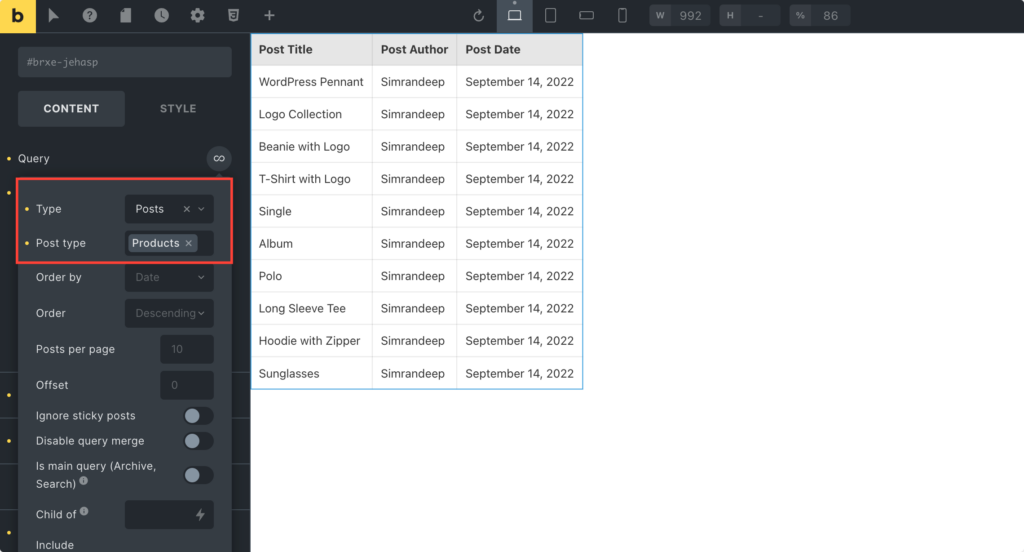
6. Define Query Options
Once you choose Query as a source, next you need to specify the type of content you want to query. In this case, you need to select Posts as a Type and Product as a Post Type to fetch WooCommerce products from your database.
You can also determine the order in which the products will be displayed in the table.
To customize the sorting order, you can choose from various parameters, such as Published Date, ID, Author, etc.
Additionally, you can specify the maximum number of products to display in the table.
7. Choose Table Type
Responsive layout is the most crucial factor in any web design. With this in mind, we have included the Normal or Responsive table option.
Choosing “Normal” creates a standard table layout, while selecting “Responsive” ensures that the table adjusts its layout dynamically to fit different screen sizes, offering a better user experience on mobile devices.
Next, you can choose your table design. The options are Sortable Table, Sortable Dropdown, and Scrollable Table.
- Sortable Table: Enabling this option allows users to sort the table columns by clicking on the headers. This functionality enhances user interaction and makes it easier for customers to find products based on their preferences.
- Sortable Dropdown: If enabled, this feature adds a dropdown menu above the table, allowing users to sort the table content based on different criteria. It provides an alternative method for sorting products, enhancing user convenience.
- Scrollable Table: Enabling this option makes the table scrollable horizontally if the content exceeds the width of the table container. It’s useful for displaying large amounts of data within a confined space, preventing the need for excessive vertical scrolling.

8. Add Dynamic Content
The second tab is DYNAMIC CONTENT. This holds the most important options, as using them, you can define exactly which WooCOmmerce product parameters are fetched in the table.
- Column Heading: Here, Specify the heading for each column in your product table. Column headings provide a clear and concise description of the information presented in each column.
- Column Data: This option defines the data displayed in each table column. Using placeholders like
{featured_image}, you can dynamically insert specific content into the table cells. For example,{featured_image}will display the featured image of each product in the corresponding column. - Link: This option lets you specify a hyperlink for each cell in the table. Users can click on the content and navigate to a designated URL.

Once you’ve configured the column headings, column data, and links, review the settings to ensure everything is set up correctly. Preview and test the product table on your website to verify that the dynamic content is displaying as expected and that the links are functioning correctly.
If you’ve followed the steps and done everything correctly, you’ll see a table containing WooCommerce Product details.
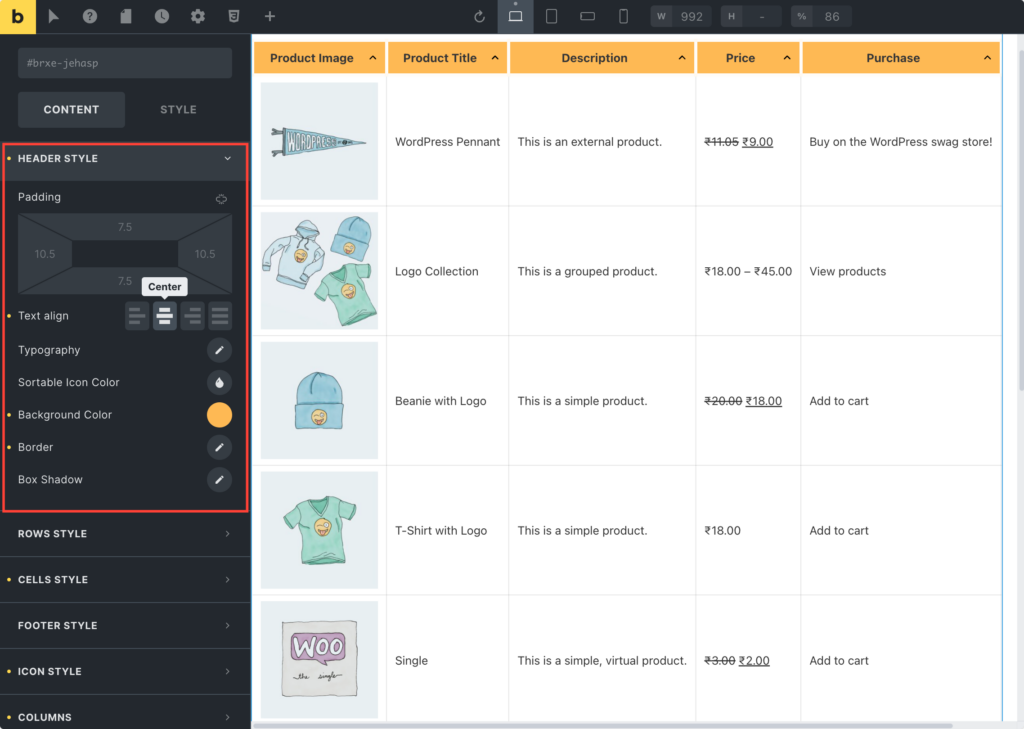
9. Customize Header, Rows, Cells, and Footer
The best feature of the Max Addons’ Table element is that it gives you complete flexibility to customize your table to every extent. You can individually style the table header, rows, cells, and footer.
For the Table Header, you get:
- Padding: Determine the space you want between the content and the edges of the table header cells.
- Text Align: Choose the alignment of the text within the header cells (e.g., left, center, right).
- Typography: Define the font style, size, weight, and color for the text in the table header. Customize the typography to match your website’s branding or to create a visual hierarchy within the table header.
- Sortable Icon Color: Set the sortable icon color next to the column headings when sorting functionality is enabled.
- Background Color: Choose a background color for the table header cells.
- Border: Specify the border’s style, width, and color around the table header cells.
- Box Shadow: To create depth and dimension, add a subtle shadow effect to the table header cells. Adjust the parameters (e.g., shadow color, blur radius) to achieve the desired visual effect.
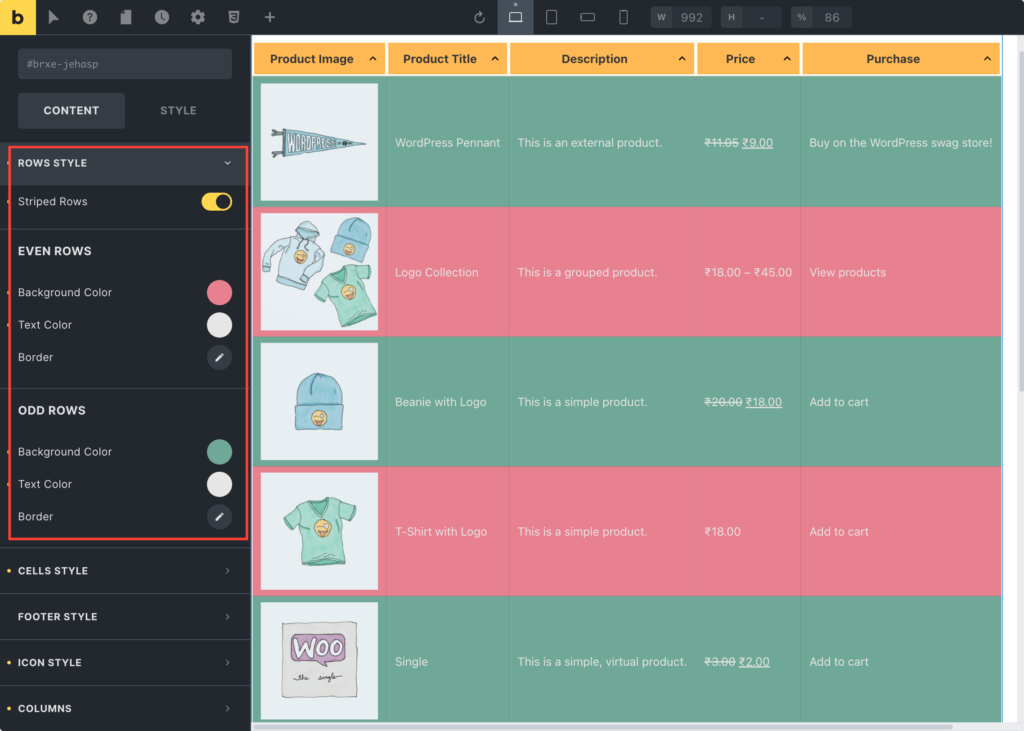
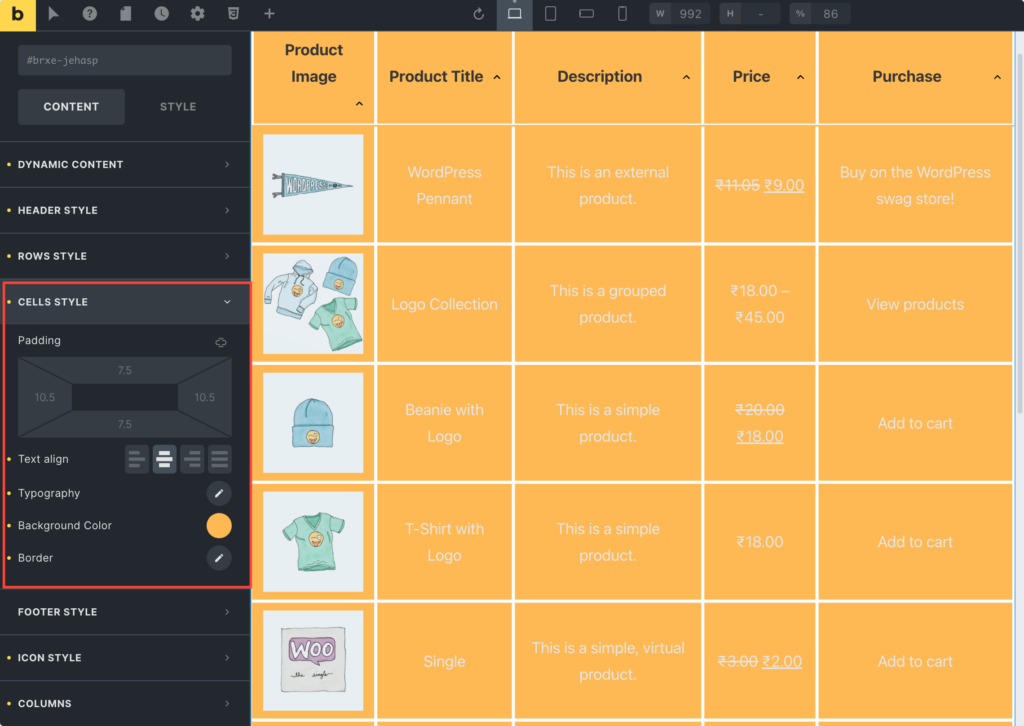
Like the Header, you get plenty of options to style the table’s Rows and Cells. Check the screenshots below to explore all the styling options.
10. Style Icon
If you added the icon in the table, you can further style it using the options available in the ICON STYLE tab. You can:
- Determine the amount of space around each icon within the table.
- Control the appearance of text associated with icons in your table. You can choose the font style, size, weight (bold or normal), and color for the text.
- Specify the dimensions of the icons displayed in your table. You can set the width and height of the icons to ensure they’re displayed at the desired size.
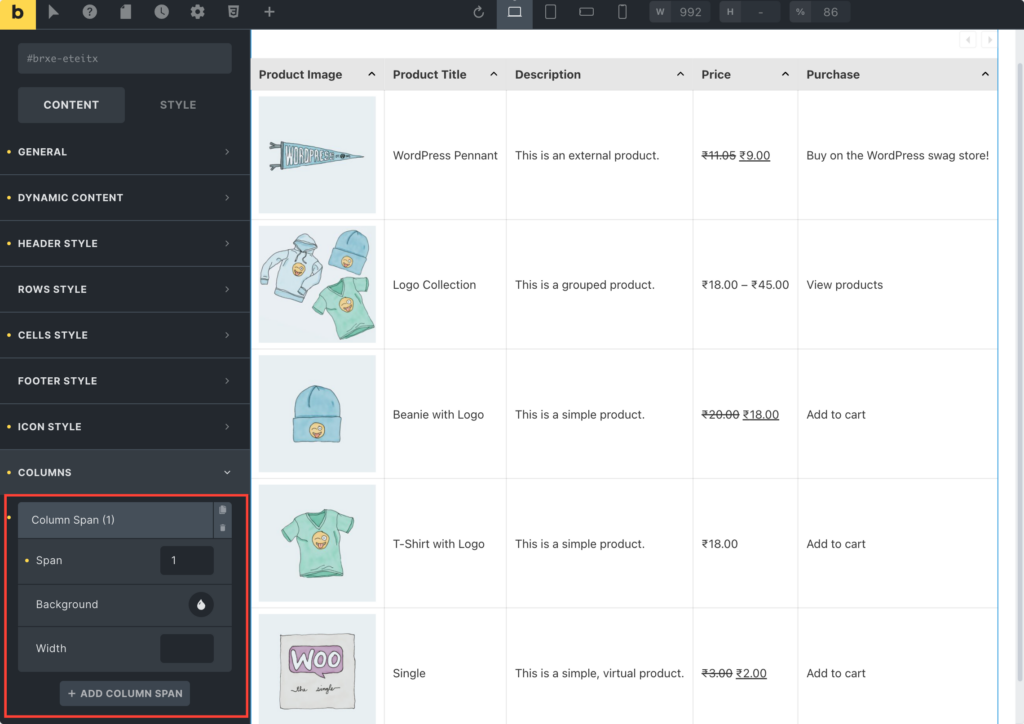
11. Define Columns Options
The last we have is COLUMNS, here you get options such as;
- Span: Determine the number of columns the current column will span across. You can adjust this setting to widen a column by spanning it across multiple columns. For example, setting the span to 2 will make the column twice as wide as a standard column.
- Background: Choose a color or an image as the background for the current column. You can customize the column’s appearance by selecting a solid background color or uploading an image.
- Width: Specify the width of the current column. You can set the width in pixels or as a percentage of the total table width. Adjusting the width allows you to control the size of the column, ensuring that it’s displayed as desired within the table layout.
And that’s it! This is how simple it is to create WooCommerce product tables with Bricks Builder. Once you are done with all the customization, don’t forget to save, refresh, and test the table to check if it works seamlessly.
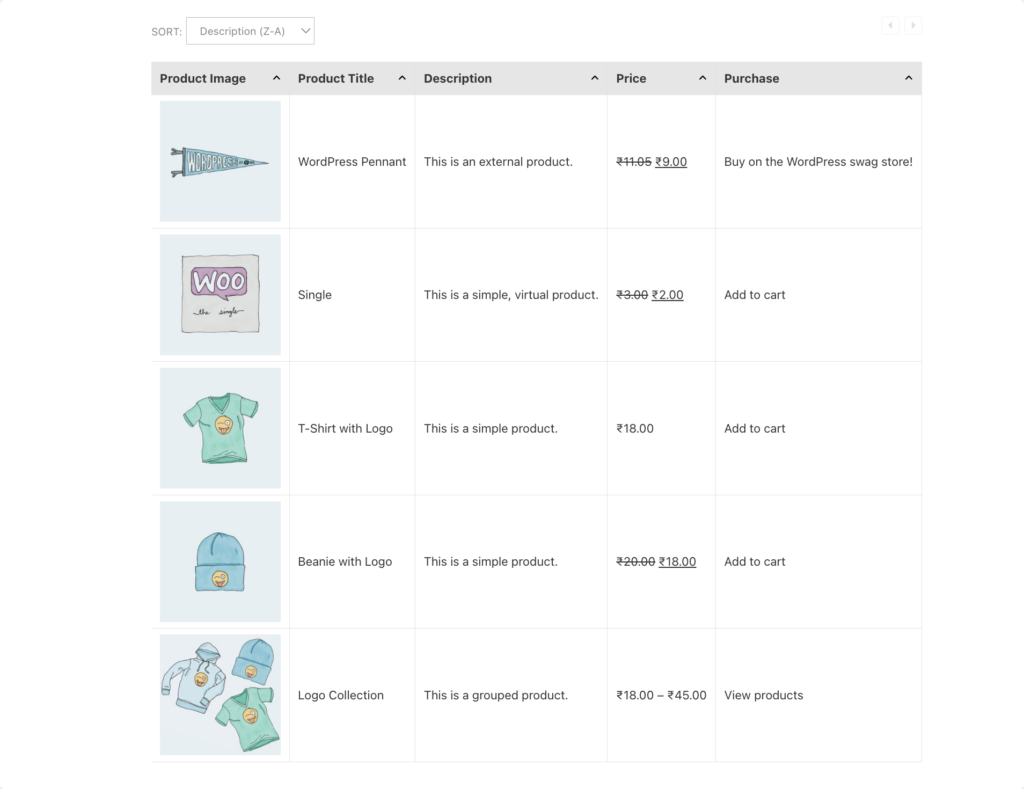
Here’s an example showcasing how WooCommerce product table will appear on the live page:
Next Read: How To Create Off Canvas Menu in Bricks Builder
Next, if you’re looking for a simple yet creative way to display the Off-Canvas menu, check out a detailed tutorial on how to create an Off-Canvas menu in Bricks Builder.
In addition to the Table Element, Max Addons offers over 20 unique elements designed to supercharge your website-building process. These elements can significantly streamline your workflow, saving you valuable time and resources. Are you ready to elevate your website creation journey? Get Max Addons today!
If you found this helpful tutorial, feel free to share your thoughts by commenting below!