Looking for a simple (and free) way to create a custom WordPress dashboard with Bricks Builder?
When you log into your WordPress website, the first thing you see is the Dashboard, a space filled with updates, elements, and lots of information.
While it’s useful, it can sometimes look cluttered and confusing, especially to people who aren’t tech-savvy.
If you build WordPress websites for clients or manage multiple sites, you’ve probably wished you could clean them up or add your own branded welcome screen, something simple that says “Welcome!” and includes quick links to the most important pages.
Good news: you can absolutely do that! 🙌
In this tutorial, we’ll walk through how to create a custom WordPress dashboard using Bricks Builder and the free plugin EasyDash for Bricks, and you won’t need to write any code.
By the end, you’ll have your very own dashboard that looks professional, fits your brand, and is easy for anyone to use.
Why Create a Custom WordPress Dashboard?
Before we dive into the steps, let’s quickly understand why you might want to customize your dashboard.
Imagine you’ve built a beautiful website for a client. They log in and see a bunch of random elements like “WordPress News,” “At a Glance,” “Quick Draft,” and so on. It doesn’t look professional, and most of it isn’t useful to them.
Now imagine instead, they log in and see:
- ✅ A warm “Welcome, John!” message
- ✅ Buttons to edit their homepage or add a blog post
- ✅ A link to contact you for support
- ✅ A section with helpful resources
That’s the power of a custom dashboard. It looks cleaner, feels more personal, and helps people focus only on what matters.
Here are a few key benefits:
- Branding: Match the dashboard to your client’s or your own brand colors and logo.
- User experience: Make it easier for non-technical users to find what they need.
- Professionalism: It makes your website setup look premium and well thought-out.
Now that you know why having a custom dashboard for your client’s website is important, let’s see how you can create one using a free plugin: no coding required!
Create a Custom WordPress Dashboard With Bricks Builder
Prerequisites: What You’ll Need
Before we begin, make sure you have:
- A working WordPress website.
- Bricks Builder installed and activated.
- EasyDash for Bricks Builder installed and activated (you can install it from Plugins >> Add New).
Optional (for advanced customization later)
If you want to enhance your dashboard with extra elements, contact forms, or creative elements, you can use Max Addons for Bricks Builder. We’ll touch on this toward the end.
What Is EasyDash for Bricks Builder?
EasyDash for Bricks is a lightweight, free plugin that lets you:
- Create a custom dashboard layout using Bricks Builder.
- Assign different dashboards to different user roles.
- Replace the default “Welcome to WordPress” screen with your own custom design.
- Add dismissible layouts so users can close them if needed.
It bridges the gap between Bricks Builder and WordPress Admin UI customization without requiring code or custom functions.
Now without any further ado, let’s start creating a custom dashboard for your WordPress website!
Install Bricks Builder
If you’re already using Bricks Builder on your website, you can skip this part. If not, purchase and install it from the official Bricks Builder website.
Once installed, activate your license key. You’ll now see a Bricks menu in your WordPress dashboard.
Install EasyDash for Bricks Builder
EasyDash plugin is free and available on WordPress.org.
To install it, go to your WordPress Dashboard >> Plugins >> Add New.
In the search bar, type EasyDash for Bricks. Click Install Now, then click Activate.
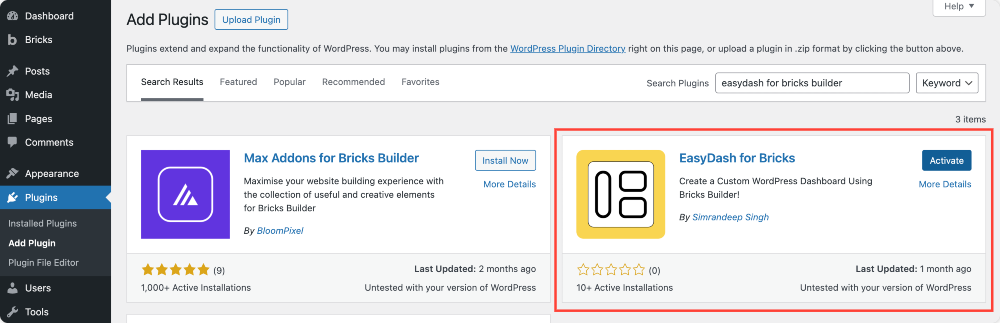
After activation, you’ll see a new option under Bricks called EasyDash.
Create a New Bricks Template
Next we need to create a new template for your custom dashboard. To do that:
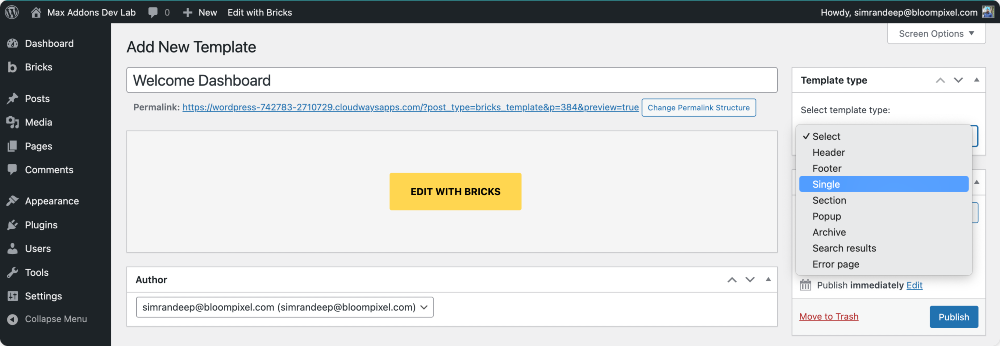
Go to your WordPress Dashboard. From the left menu, navigate to Bricks >> Templates.

Click on the Add New Template button at the top. Choose Single as your template type. Give your template a name.
For example, call it Welcome Dashboard. Click on Save Draft.
Design Your Custom Dashboard Layout
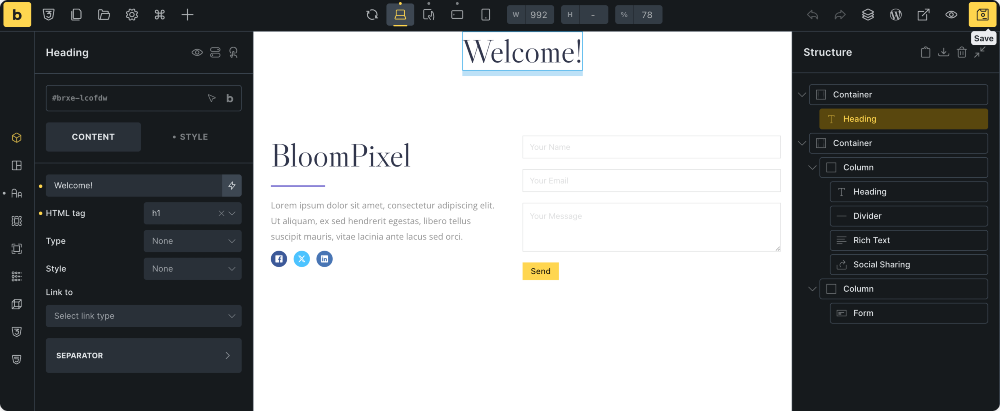
After creating your template, the next step is to design your dashboard layout using Bricks Builder Editor. You can style it any way you like!
Here are a few tips to help you build a clean, professional, and easy-to-read dashboard:
- Keep it clean and simple. Don’t overload your dashboard with too many elements. Include only what’s important for your users.
- Use columns for better readability. Two or three columns are perfect for most layouts.
- Stay consistent with the WordPress backend style. Your dashboard should blend in nicely with the rest of the admin area.
- Pay attention to fonts and spacing. Use simple fonts that are easy to read and make sure everything has enough breathing room.
- Add helpful content. You can include a welcome message, shortcuts to common pages, stats, forms, or even contact information.
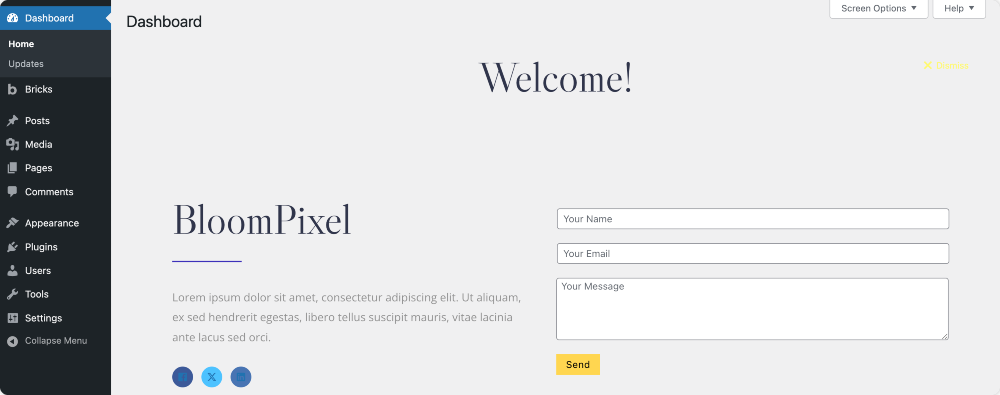
Here’s an example of what your layout might include:
- A friendly “Welcome” message.
- Quick links to edit posts, pages, or products.
- A small area showing recent updates or notifications.
- A contact or support form for team members or clients.
Once you’re happy with the layout, click Publish to save it.
Assign Your Dashboard Layout to User Roles
This is where EasyDash for Bricks Builder becomes really useful. It lets you choose who can see which dashboard layout.
For example, you can create one dashboard for administrators and another one for editors or authors.
Here’s how to assign your layout:
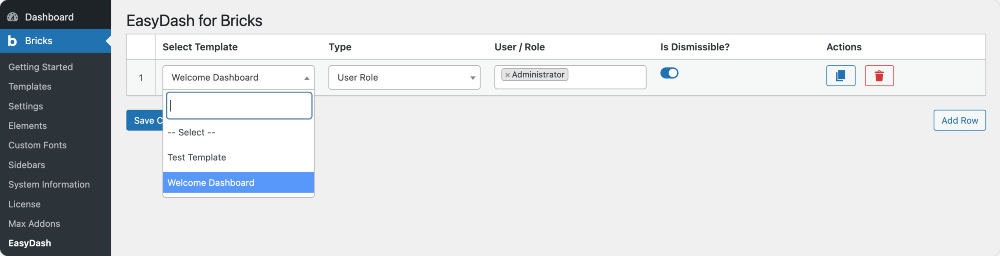
Go to Bricks >> EasyDash in your WordPress Dashboard. You’ll see a list of user roles such as Administrator, Editor, Author, and so on.
Find the user role you want to assign your layout to. For this example, we’ll use Administrator. From the dropdown menu next to “Administrator,” choose the layout you created (e.g., “Welcome Dashboard”).
Optionally, check the Is Dismissable box. This adds a small “x” button at the top-right corner of your dashboard so users can close the welcome screen if they want to.
Click Save Changes.
Now, when you visit your WordPress Dashboard, you’ll see your new custom layout appear!
Test and Refine Your Dashboard
Go back to your WordPress Dashboard to see your new design in action.
- Check that everything looks good and displays correctly.
- Make sure your links, buttons, and forms work as expected.
- If something feels off, you can always go back and edit your Bricks template until it’s perfect.
Create Dashboards for Other User Roles (Optional)
If you want to make WordPress even more personalized, you can create different dashboards for different roles.
For example:
- Admins could see quick access to site settings, plugin updates, or analytics.
- Editors might see shortcuts for creating and managing content.
- Clients could see a branded welcome message with links to support or reports.
To do this, simply repeat the same process:
- Create a new template for each dashboard.
- Assign it to a different user role in EasyDash Settings.
Take Your Dashboard to the Next Level
If you want more design flexibility and additional elements, try using Max Addons for Bricks Builder.
With this plugin, you get access to 50+ premium elements that can make your dashboard even more dynamic.
You can:
- Add forms from Gravity Forms, Ninja Forms, Contact Form 7, WPForms, and more.
- Display charts, stats, or data using advanced elements.
- Include call-to-action blocks, images, or videos.
Conclusion!
That’s it! You’ve just built your very own custom WordPress Dashboard using Bricks Builder and EasyDash without writing a single line of code.
This setup is perfect for web agencies, freelancers, or anyone who wants to give their clients a cleaner, branded dashboard experience.
What do you think about the EasyDash plugin?
Would you use it to make your own WordPress Dashboard more personalized? Share your thoughts in the comments below!
