
Are you looking for a creative yet easy way to embed Google reviews in WordPress using Bricks Builder? If so, you’re in for a treat!
Displaying reviews on a website helps build trust with potential customers by showcasing positive feedback from real people. Additionally, featuring Google reviews on your website extends your brand’s visibility beyond the Google platform, reaching a wider audience.
In this post, we will learn how to display Google reviews on your website using Bricks Builder and Max Addons.
Before we proceed, let’s first see some benefits of showcasing reviews on your website.
Benefits of Adding Reviews on a Website
You might be thinking, why should you add reviews to your website?
Okay, ask yourself: What’s one of the first things you do when you’re thinking about trying out a new restaurant or buying something online?
You probably check what other people are saying about it, right?
Imagine you’re looking at a website for a local bakery, and right there on the page, you see comments from real people saying how amazing the cupcakes are or how friendly the staff is. It gives you a sense of what to expect and helps you feel more confident about giving them a try.
Why would a business want to showcase those reviews on its website? Well, it’s like having happy customers vouch for you 24/7. It builds trust with visitors who might be on the fence about whether to buy from you or not. Plus, Google loves fresh content, so having those reviews on your site can boost your visibility in search results.
It’s not just about making the business look good. Those reviews also give valuable insights to potential customers. They can see what others liked or didn’t like about the product or service, which helps them decide if it’s right for them.
So, it’s a win-win: businesses get to show off their happy customers, and potential customers get the inside scoop to help them make smarter choices.
How To Embed Google Reviews in WordPress Using Bricks Builder
Now, what’s the easiest way to embed reviews on a website?
If you have a WordPress website built using Bricks Builder, the best tool that you can leverage to showcase Google reviews is the Max Addons Reviews element.
Max Addons is an exclusive add-on for Bricks Builder. It includes 20+ creative elements that make website building super easy.
With the Max Addons Review element, you can fetch Google reviews on your WordPress website without hassle. You need to add your Google Places API key to the element, and it will automatically retrieve reviews and display them on your WordPress website.
Additionally, you get many styling and customization options to alter review design as per your website branding.
That sounds interesting… right? So, without further ado, let’s see how to embed Google reviews in WordPress using Bricks Builder and Max Addons.
Get the Google Places API Key
First, you will need to generate the Google Places API key to display your Google business reviews.
Note: Before proceeding with the API key procedure, you must have an active billing account linked to your Google API Key. Ensure that you enable your billing account beforehand.
Obtaining Your Google Places API Key
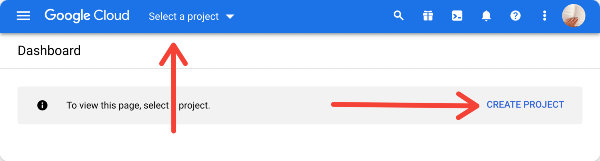
Step 1: Visit the Google Developer Console and click “CREATE PROJECT” to establish a new project. Alternatively, select an existing project from the “Select the Project” dropdown.
Step 2: Once your project is created, click on “ENABLE APIs AND SERVICES.”

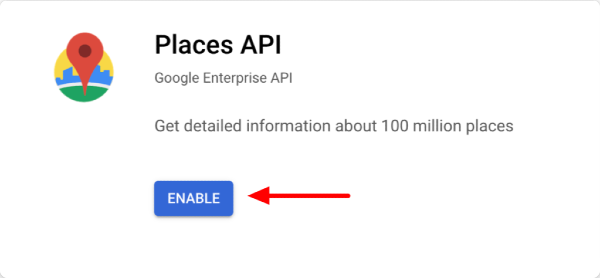
Step 3: This action will redirect you to the Google API library. Use the search bar to find “Places API,” select it, and click “ENABLE.”
Step 4: After enabling the API, access the hamburger menu and navigate to “APIs & Services”>> “Credentials.”
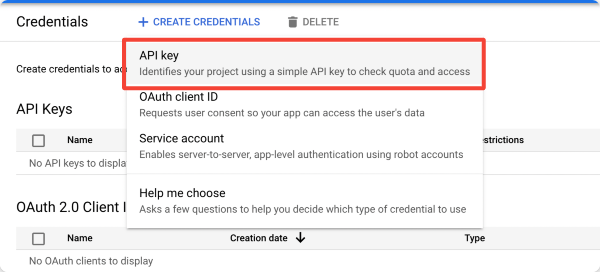
Step 5: On the next page, click the “+ CREATE CREDENTIALS” button and select the “API Key” option.

Step 6: The newly generated API key will appear in a pop-up box. Copy this key and proceed to your WordPress website.

Add Google API Key to WordPress Site
You’ve successfully generated the Google API key. Now, integrate this key into your WordPress site to access Google services.
Step 1: Head to the Admin Dashboard > Bricks > Max Addons > Integration.
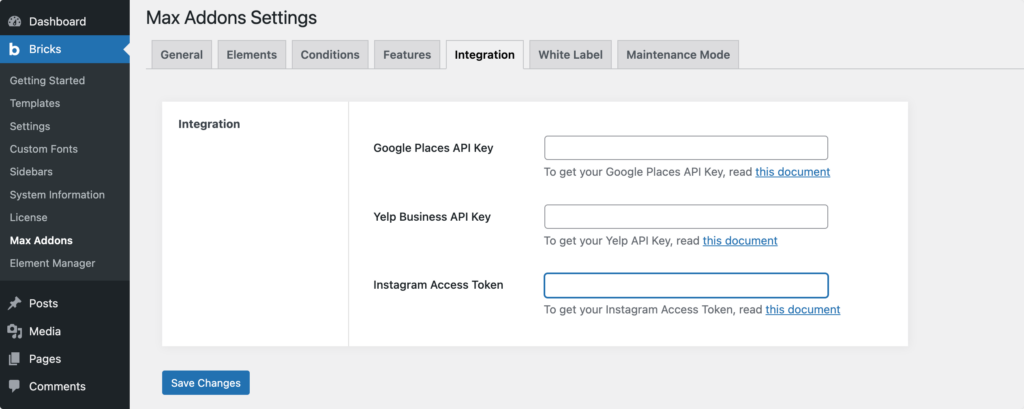
Step 2: Paste your API key into the designated field for the Google Places API key.
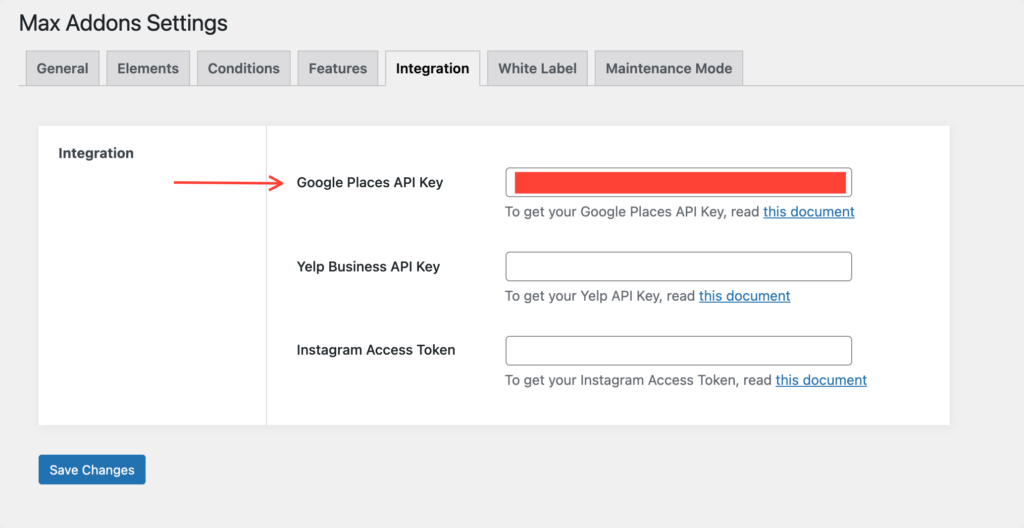
Step 3: Ensure you save your changes by clicking the “Save Changes” button.
That’s it! You’ve successfully obtained and added your Google Places API key to display the business reviews on your WordPress site.
1. Install and Activate Max Addons
Once you add the Google Places API key, the next step is to ensure that Max Addons is installed and activated on your WordPress website.
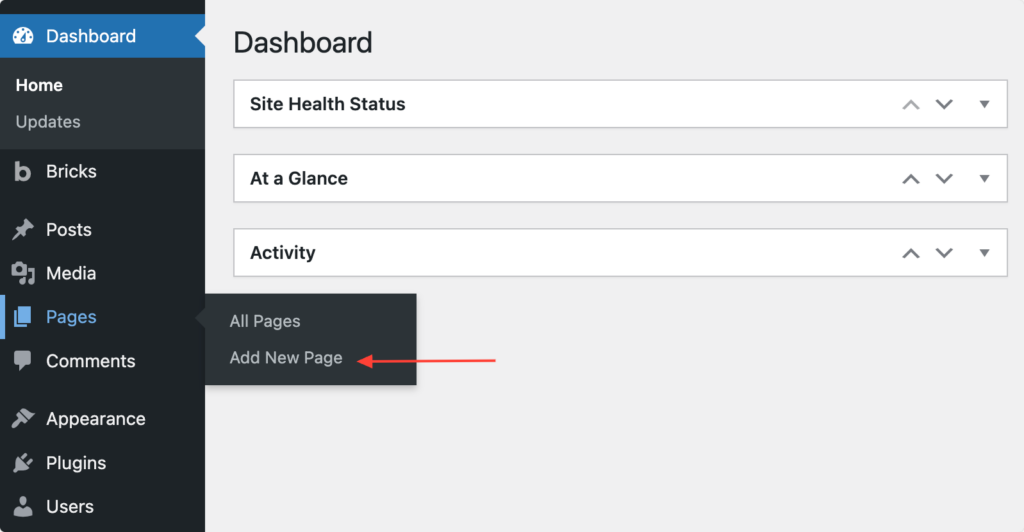
2. Create a New Page
After activating Max Addons, head to the WP dashboard and add a new page or edit the existing page where you want to showcase Google Reviews.
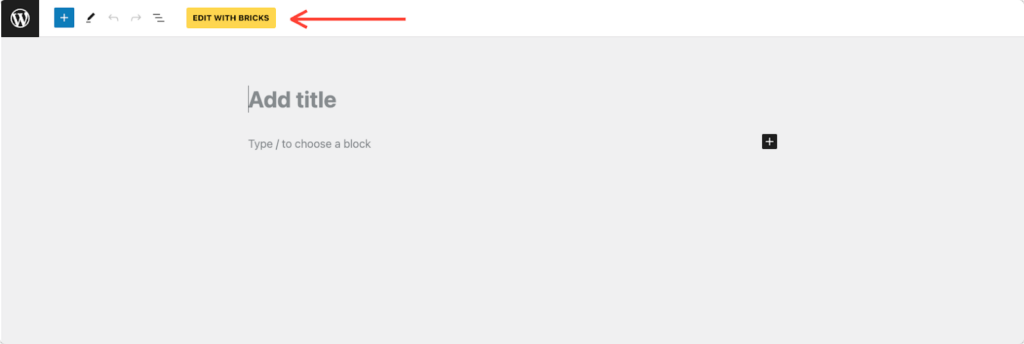
3. Edit with Bricks Builder
After creating your new page, click the Edit With Bricks button.
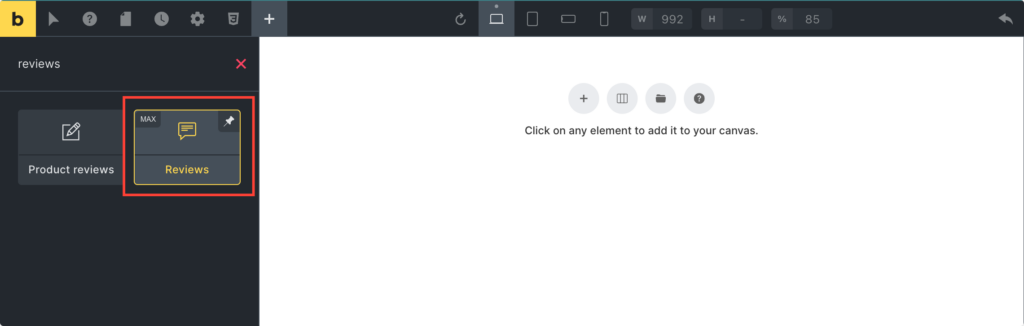
4. Add Max Addons Reviews Element
Once the page opens, look for the “reviews” element within the Bricks Builder elements area. When the element appears, click on it to add it to your page. Make sure to check the “Max” tag in the upper left corner of the icon.
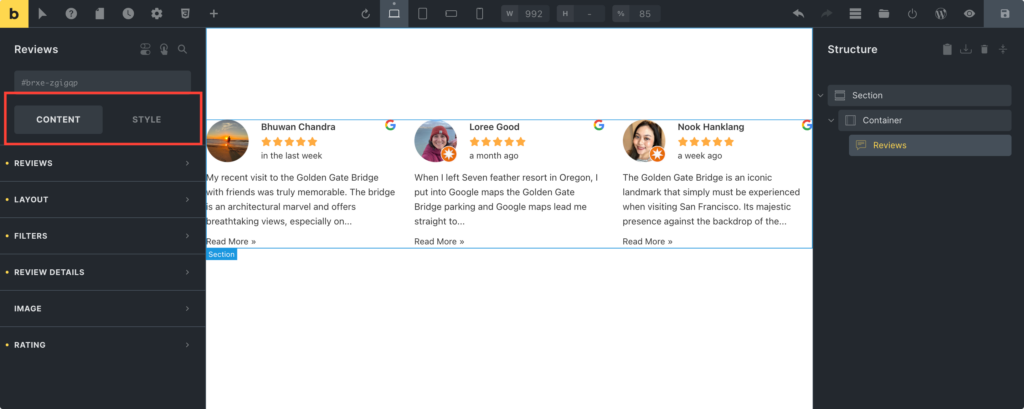
When you add the element to the page, its setting option appears on the left panel. The Reviews element includes the Content and Style tab.
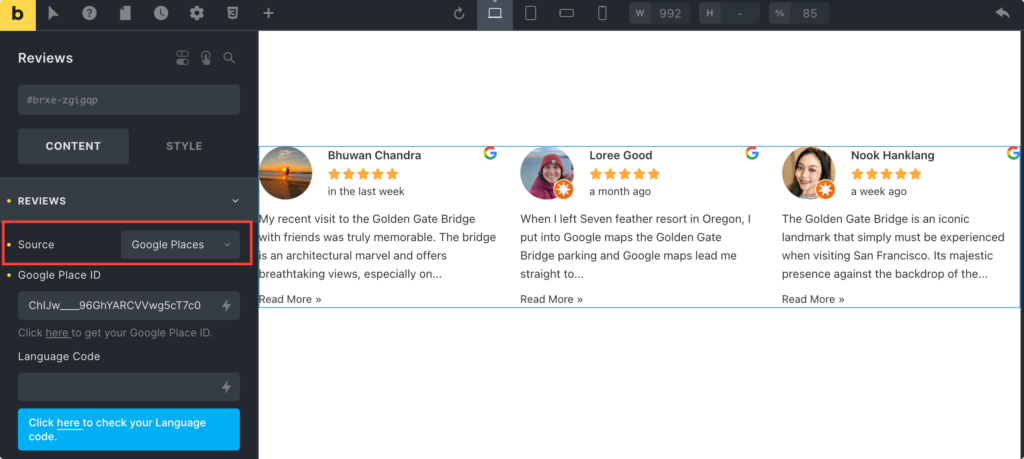
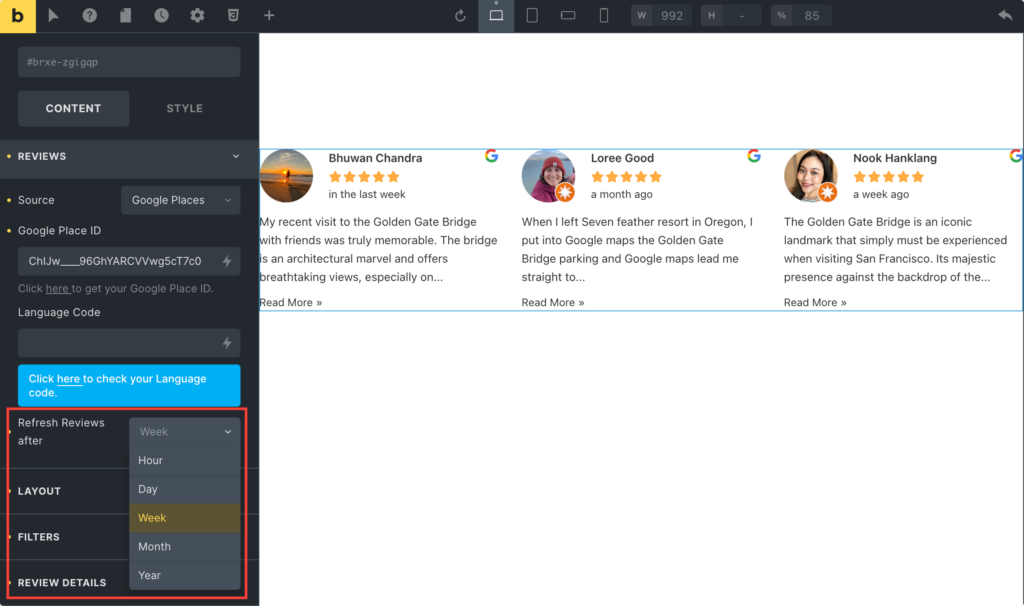
5. Choose Review Source
In the Content tab, under the Review section, the first option is Source.
This option allows you to select the source of the reviews. In this case, you need to choose Google Places.
As soon as you choose Google Places as the source, a new option will appear, i.e., Google Place ID. Here, provide the Google Place ID of the location where you want to display reviews.
In the Language Code tab, specify the language code for the reviews to be fetched in the desired language. For more information on language code, click here.
Using the next option, Refresh Reviews After, you can decide how frequently the reviews are updated or refreshed from the Google Places source. Choosing an appropriate refresh interval ensures that your displayed reviews remain current and accurate.
6. Select Skin & Layout
Showcasing reviews in a dull and boring layout is not going to work. That’s why we have added the Skin and Layout options to our Reviews element. These options help you present Google Reviews in the most beautiful and eye-catching layouts.
You can choose between two skins, Classic and Card. Classic offers a traditional layout, while Card provides a modern card-based design. You have complete flexibility to select the skin that best compliments your website’s overall aesthetic and design goals.
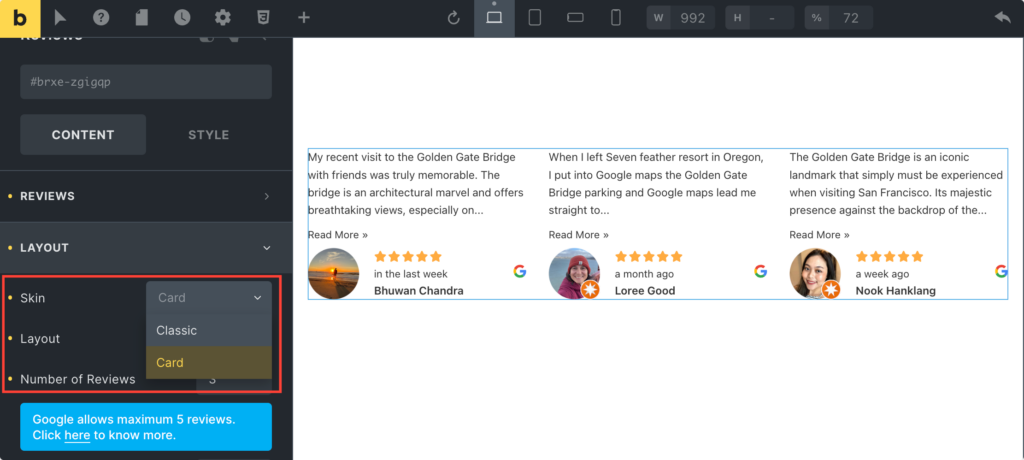
Once you select the skin, you need to choose the Layout. The options for organizing and displaying reviews are Grid and Carousel layouts. Grid presents reviews in a structured grid format suitable for displaying multiple reviews simultaneously. On the other hand, Carousel allows users to scroll through reviews horizontally, one at a time.

Well, the customization options didn’t end here; you can even style your review section more using the options mentioned below:
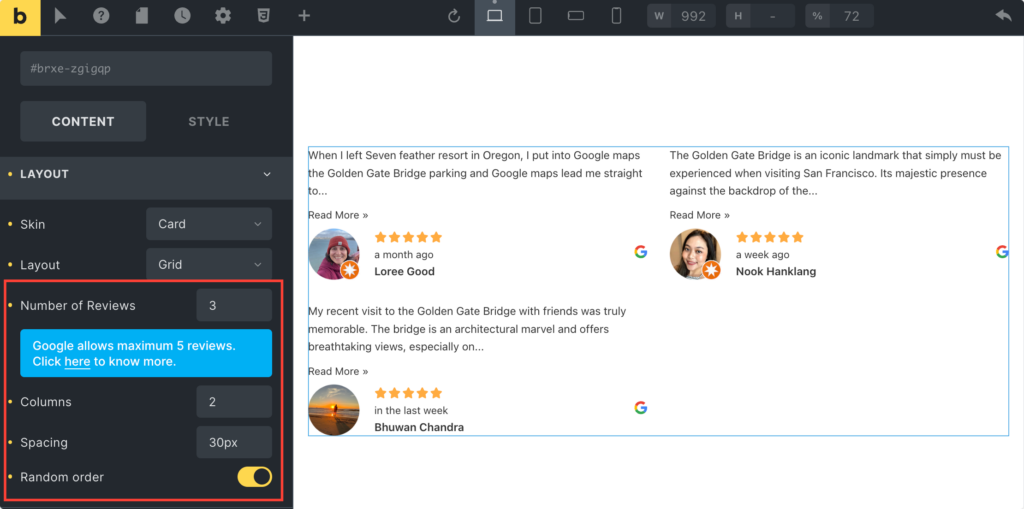
- Number of Reviews: Specify the maximum number of reviews to display. Google allows a maximum of 5 reviews per request. Adjust this setting based on the space available on your webpage and the amount of review content you want to showcase.
- Columns: Set the number of columns in which to display reviews. This option is particularly relevant when using the Grid layout. Adjusting the number of columns can help optimize the design for different screen sizes and resolutions, ensuring a visually appealing and user-friendly display of reviews.
- Spacing: Customize the spacing between each review. This option lets you control the space between reviews, ensuring proper alignment and readability. Adjust the spacing to achieve a balanced and visually appealing layout that enhances user engagement.
- Random Order: Enable this option to display reviews in a random order. Randomizing the order of reviews can prevent bias and keep the display dynamic, providing users with a fresh experience each time they visit your webpage. Consider using this option to keep user engagement high and showcase a diverse range of reviews.
7. Filter Reviews
The Reviews element also allows you to filter reviews. You have 3 options for filtering the reviews displayed within the Reviews element.
- If None is selected, no filtering will be applied, and all available reviews will be displayed.
- If Minimum Rating is selected, you can specify a minimum rating, and only reviews meeting that rating will be displayed. For example, if you set a minimum rating of 3 stars, only reviews with three stars or higher will be shown.
- If Date is selected, you can filter reviews based on their publication date. This allows you to display only the most recent reviews, ensuring that users are presented with the latest feedback.
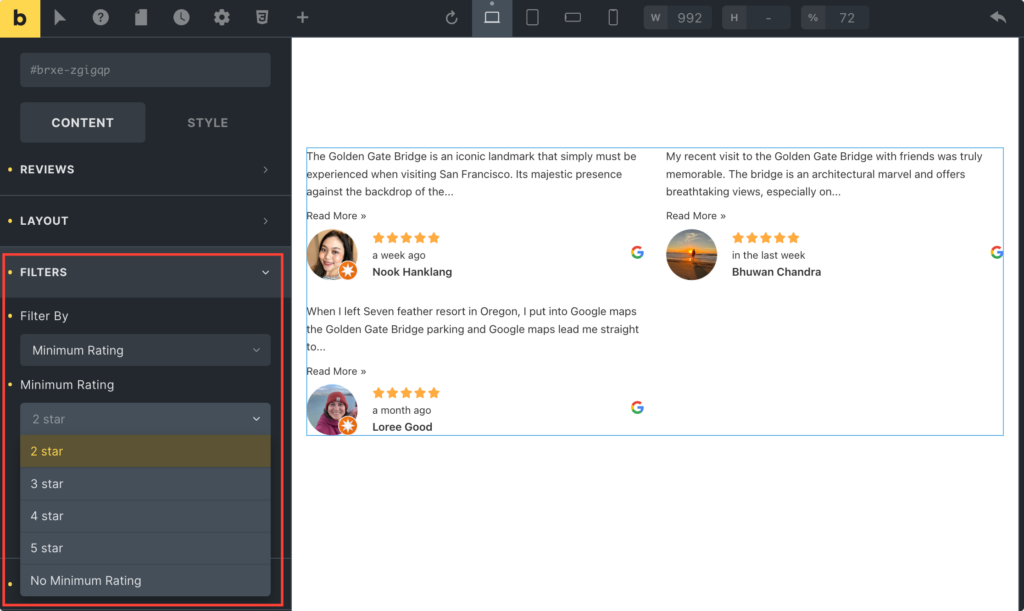
These advanced controls enhance the user experience by ensuring that only high-quality or recent reviews are featured.
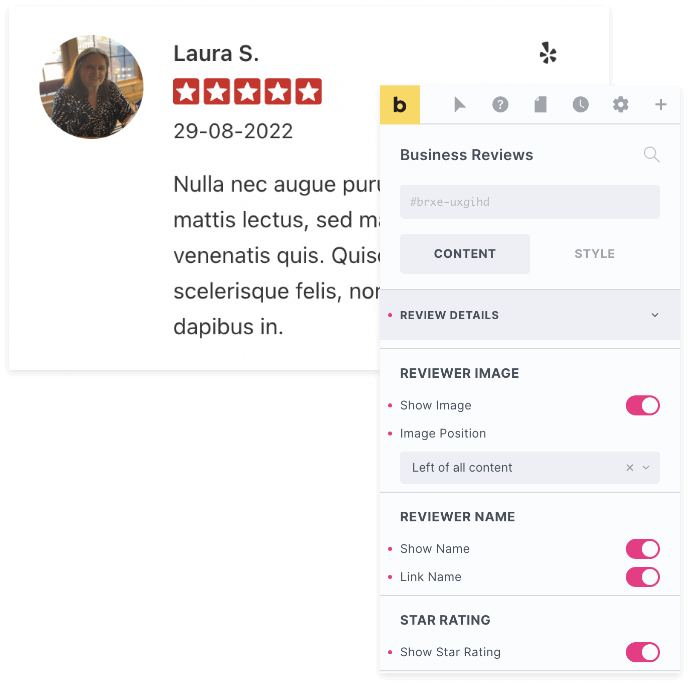
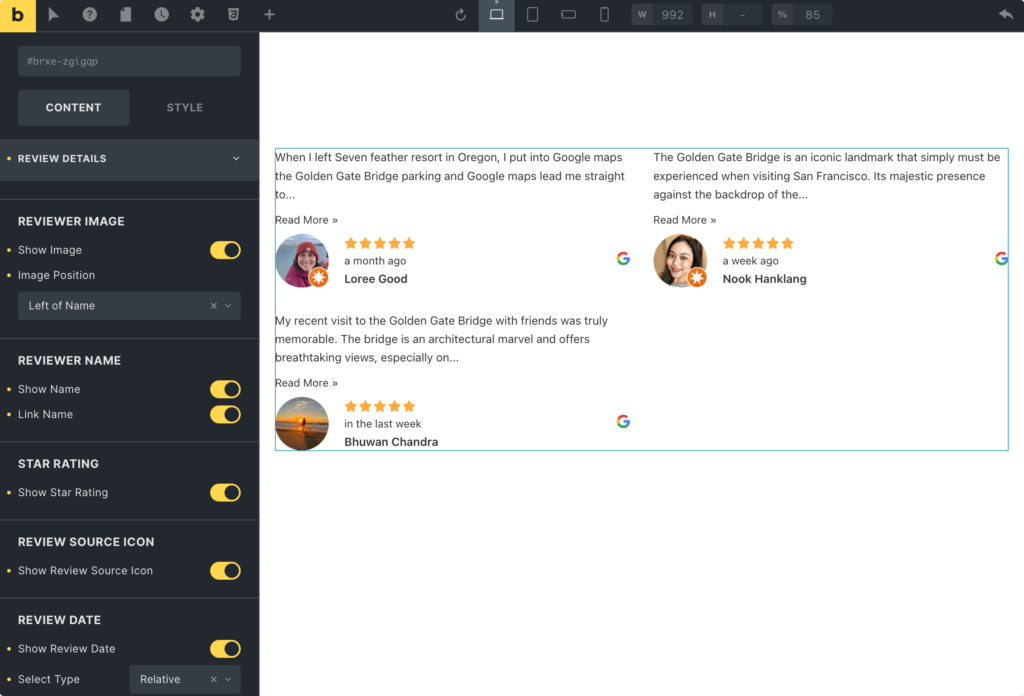
8. Customize Google Review Details
Next, you get the Review Details section that offers extensive customization options to tailor the presentation of review details according to your preferences and design requirements.
Let’s go through and understand each option in detail:
- Reviewer Image: Enabling this option will display an image associated with each reviewer. This can add a personal touch to the reviews and enhance credibility, as users often find it easier to connect with reviews when there’s a face associated with them.
- Reviewer Name: By toggling this option, you can choose whether to display the reviewer’s name alongside their review. Additionally, you can choose whether to make the reviewer’s name clickable, linking users to the reviewer’s profile or website for further context.
- Star Rating: When this option is enabled, the star rating associated with each review will be displayed. Star ratings provide a quick and visually intuitive way for users to assess a review’s overall quality or satisfaction level. Including star ratings can significantly impact users’ perception of the review’s credibility and relevance.
- Review Source Icon: Enabling this option will display an icon representing the review source (e.g., Google) alongside each review. Displaying source icons helps users identify where the reviews are sourced from, enhancing transparency and trustworthiness.
- Review Date: Choose whether to display the date of each review. Displaying review dates provides users with temporal context, helping them gauge the recency of each review and assess its relevance. You can also select the type of data representation, such as relative (e.g., “3 days ago”) or numeric (e.g., “March 10, 2024”), depending on your preference and design requirements.
- Review Text: Toggle this option to display the full text of each review. Including review text allows users to read the details and context of each review, providing them with valuable insights into other users’ experiences. You can customize the text’s length and configure options for displaying a “Read More” link, ensuring a balance between providing sufficient information and maintaining a clean layout.
9. Style Image, & Rating Icon
Lastly, you get options to customize the appearance of the reviewer image, star icons, and associated colors.
For image customization, you can:
- adjust the size of the reviewer images.
- customize the border of the reviewer images to enhance their visual presentation.
- enable/disable the box shadow effect for reviewer images.
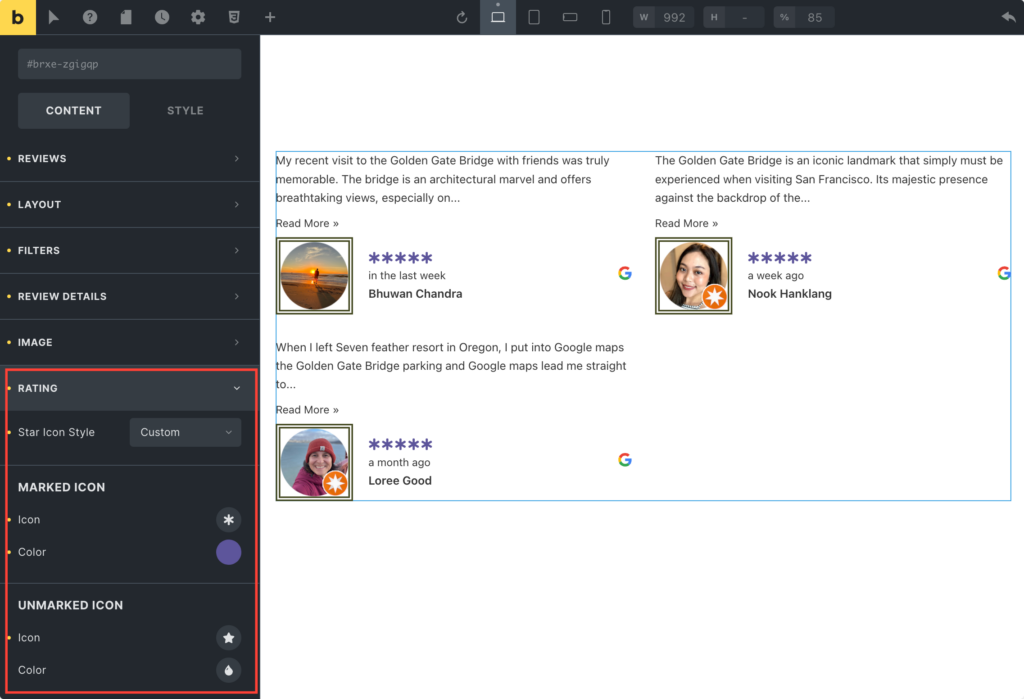
For rating customization, you can:
- select between two styles for the star icons used to represent ratings within the Reviews element.
- choose the icon that will represent marked reviews. This icon is typically displayed next to reviews that have received a positive rating or feedback.
- customize the color of the marked icon to match your website’s color scheme or branding.
- choose the icon that will represent unmarked reviews. This icon is typically displayed next to reviews that have not received a positive rating or feedback.
- customize the color of the unmarked icon to differentiate it from the marked icon and ensure clarity in the representation of ratings.
Wrapping Up!
I am sure by using the review element, you can smoothly display Google Reviews on your Bricks Builder.
Not only the Review element, but Max Addons provides over 20 unique elements. These elements can rocket your website-building process, ultimately saving you time and money. Ready to enhance your website creation journey? Get Max Addons today!
If you found this helpful tutorial, feel free to share your thoughts by commenting below!